How to Make Pumpkin Spice Soap at Home (Cold Process With Lye)
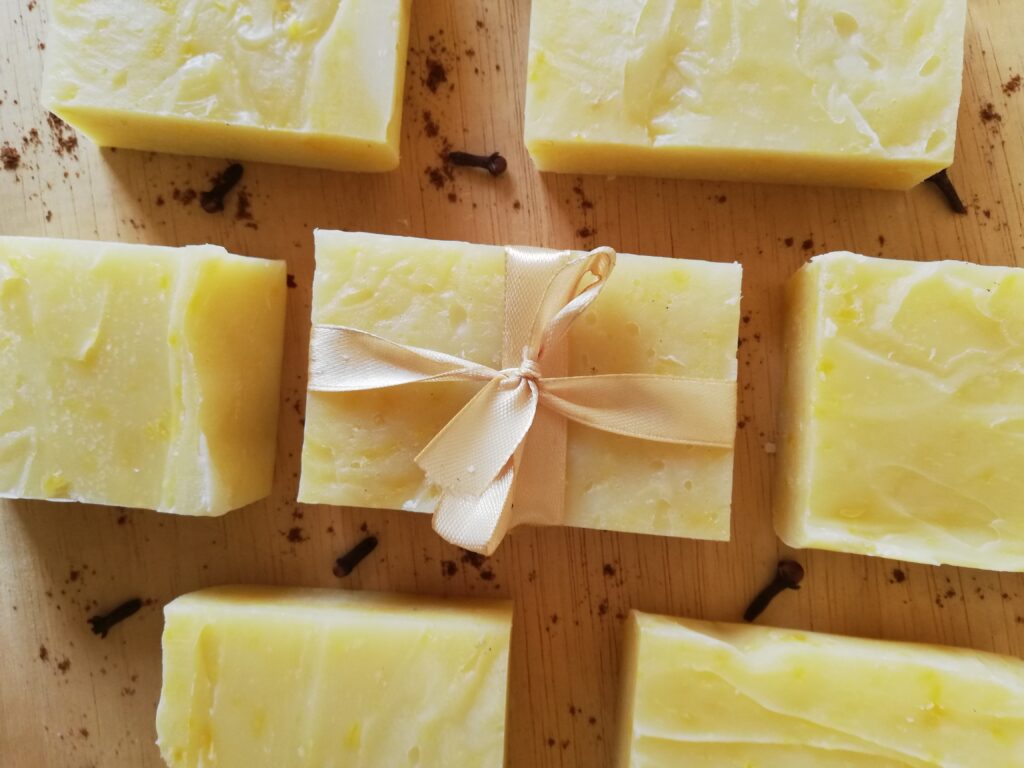
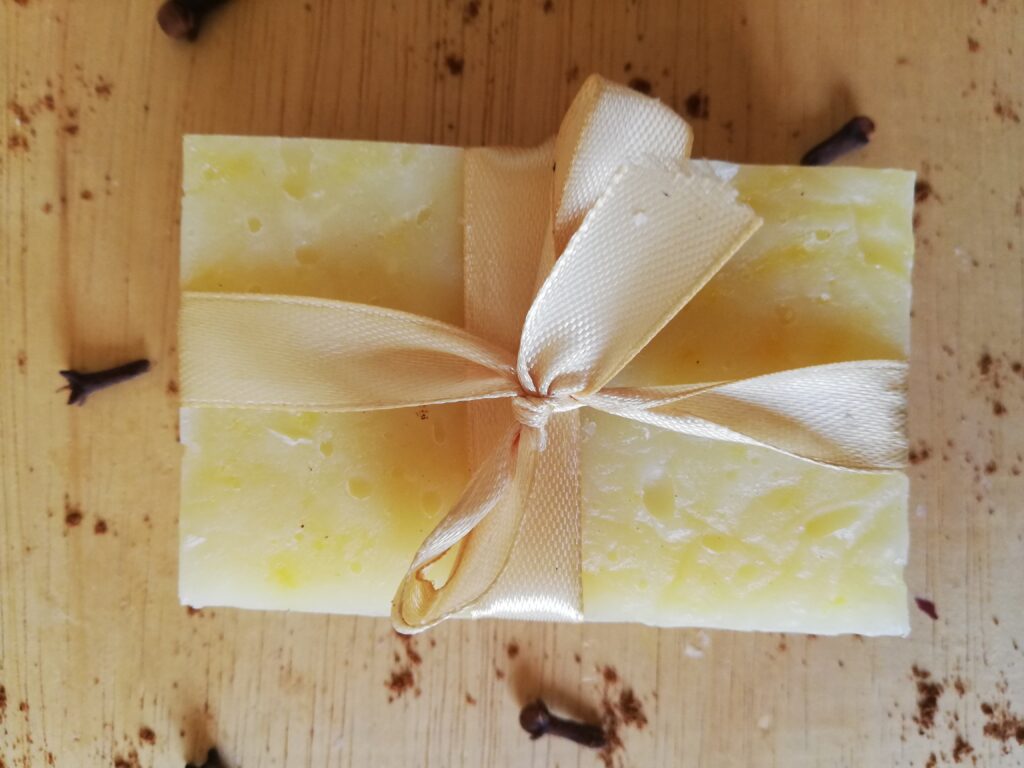
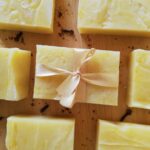
This nourishing cold process pumpkin spice soap is perfect for cozy seasonal gifting. Made with the traditional cold process method, it combines four budget-friendly yet nutrient-rich fats you likely already have in your kitchen (and if not, they’re easy to find almost anywhere). A swirl of pumpkin added at medium trace enriches the soap, giving it skin-loving benefits and a gorgeous golden color, flecked with deeper amber tones.
Why Make Pumpkin Soap at Home From Scratch
Making soap from scratch gives you full control over every ingredient — and honestly, it’s super fun! People are often amazed when they find out you make soap by hand; it’s such a rewarding traditional skill. When I first started exploring old-fashioned crafts, soap making was right up there in my top three, along with knitting and bread baking. Once you understand the process, it’s not difficult at all. Master a few basic recipes and techniques, and you’ll be whipping up hand soaps, shampoo bars, and shaving bars without a hitch. This pumpkin spice soap, with its light golden hue and dark gold flecks of pumpkin, makes especially beautiful gifts.
Please, please don’t let the list of tools or steps intimidate you. Most of what you need is probably already in your kitchen — a few old spoons, some plastic containers, a pair of rubber gloves, and a kitchen scale will get you most of the way there. And if you’ve ever made candy or roasted meat, chances are you already own a digital thermometer.
I’ve broken the soap-making process into small, simple steps so you can follow along easily. Once you grasp the basics, you’ll be ready to embark on your own soap-making adventure — and you’ll find that nearly every cold process recipe follows the same basic pattern (with small variations here or there).
Understanding the Cold Process Method
Cold process is the method of making soap at room temperature or just slightly above. The only heat involved is when melting the fats and oils. Once you combine water, lye, and oils, a chemical reaction called saponification transforms those oils into soap. Lye is essential for this process — you can’t make real soap without it — but there are “melt and pour” options that let you work with a premade soap base, adding your own scents, colors, and designs. Cold process produces a hard, smooth bar of soap, whereas hot process soap tends to have a rougher, more rustic surface.
The main drawback of cold process is patience — your soap needs to cure for 4 to 6 weeks before it’s ready to use. If you tried to use it straight away it would turn into a squishy mess quite fast! If you’re making it as a gift, plan ahead and allow the full curing time (six weeks is ideal) so your bars will be firm, long-lasting, and gentle on the skin.
What Is the Basic Formula for Soap?
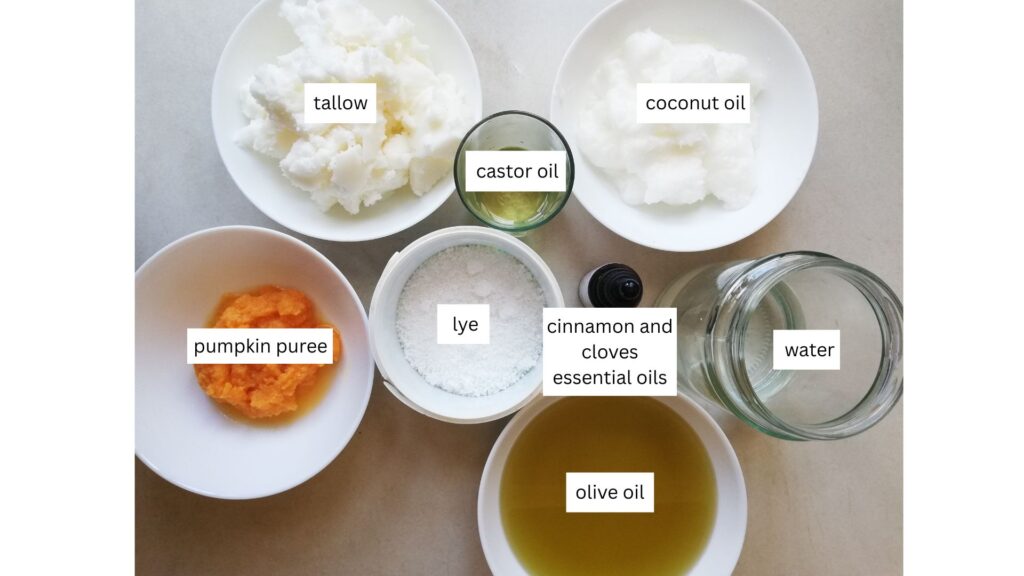
- To make soap from scratch you need lye (sodium hydroxide), water (sometimes other liquids are used in various recipes), fats, and oils.
- A good balance of fats and oils is essential. This recipe uses 35% tallow, 30% coconut oil, 30% olive oil and 5% castor oil with 10% superfat to create a hard soap bar with good lather, which is both cleansing and conditioning.
- Because this recipe uses some pumpkin puree added at trace, I have reduced the water in the recipe to account for that.
Choosing the Best Oils for Soap
I tried to make this recipe simple, so I chose four fats which are both inexpensive, nourishing, and easy to obtain. Each of them offers slightly different benefits to the soap.
Tallow is cleansing and conditioning, adds a good lather and hardness to the soap.
Coconut Oil is cleansing and makes a hard soap bar with good lather.
Olive Oil is very gentle and conditioning, high in antioxidants and vitamin E.
Castor Oil gives soap an amazing lather. It is also very moisturizing and conditioning.
The pumpkin puree which I also included in the recipe adds natural sugars and a golden color and the essential oils (which are optional) make it smell amazing.
IMPORTANT NOTE: If you would like to swap out any of the oils for different ones, you will need to use an online lye calculator to recalculate the amount of lye you will need. If you are a newbie soap maker I could encourage you to follow the recipe to the letter and only start creating your own soap recipes once you become more experienced.
Tips for Success
Prepping your ingredients
- It is important to weigh all the ingredients accurately so a digital scale is essential. You can get all your ingredients ready the day before you intend to make soap if you like – this will shorten the time you will need to reserve for the actual making of the soap.
- Make sure to store lye in a dry place in an airtight container. Otherwise the lye will absorb moisture from the air, become clumpy and won’t be usable any longer.
- Read all the steps in the recipe carefully so you understand the process before proceeding with the recipe.
- Making this soap will take about 2 hours from weiging out the ingredients to cleanup. Make sure that during these 2 hours you won’t be disturbed. Put your phone on silent mode and get someone else to watch your younger kids. No children or pets should be in your soap making area.
- Avoid using aluminium spoons or containers in soap making. Glass, stainless steel, wood or tough (heatproof) plastic are all fine.
- For safety keep separate spoons and containers for handling and mixing the lye. All other tools should be rinsed in warm water mixed with a few tablespoons of vinegar, then washed in hot soapy water and rinsed well.
Making the soap
- Always add lye to water, not the other way around.
- When mixing lye with water, you need to be outside or at least standing by a wide open window because of the harmful fumes. Once the lye has completely dissolved, you can bring the mixture back inside. I cover more safety issues in the ‘Tools You’ll Need’ section below.
- Often you will find that either the pot of oils or the lye solution cool faster. To make sure that they come to the right temperature at the same time, you can place either or both in a hot or cold bath. For instance when I was making this batch of soap my lye was cooling slower than the pot of oils. I could either place the pot of oils in a warm bath to slow down its cooling or place the jar of lye in a cold bath to make sure it cools faster. (I chose the second option).
- If you want your pumpkin spice soap to be a little darker in color and without the specks of pumpkin visible in it, add the pumpkin puree at light trace. I added the puree at medium trace to get soap lighter in color but with little dark gold specks of pumpkin visible in it. If you add the puree at medium trace, you need to pour the mixture into the mold quickly – adding puree will make it thicken fast.
Types of trace
LIGHT TRACE is when oils and lye water are emulsified but the mixture is still quite thin. If you drizzle a little soap on top, it leaves a trail that is not raised from the surface and is hard to see, except in bright light.
MEDIUM TRACE is when the consistency is thicker and when you drizzle a little of the mixture over the batter, you see a slightly raised trail.
THICK TRACE is when the consistency of soap is like a thick pudding.
Cold Process Pumpkin Soap Recipe (With Lye)
Ingredients
- The exact amounts of ingredients needed are listed in the recipe card. Always measure accurately and do not round up any measurements. It is essential to use grams or ounces in soap recipes for good results.
- This recipe will make 12 (4oz) bars of soap.
- The essential oils are optional. They add a beautiful pumpkin spice scent to the soap. I chose cinnamon and cloves oils because they are quite easy to get. However, you could use nutmeg and allspice essential oils either instead or in addition to the oils I chose. Make sure the total weight of essential oils you add is 1 ounce.
Tools You’ll Need
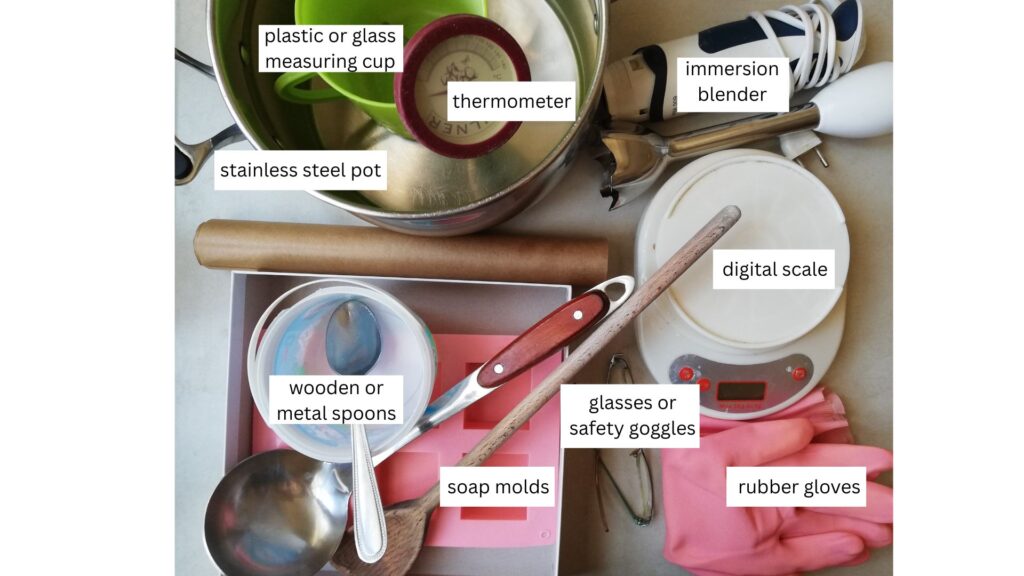
- Digital scale is essential for weighing the ingredients accurately.
- To protect yourself from being accidentally splashed with lye, wear a long sleeved shirt, glasses or goggles, and rubber gloves when handling lye. If you accidentally get a drop of lye on yourself, dab that spot with some plain white vinegar (it neutralises the lye).
- Use a metal or wooden spoon for mixing the lye and a large wooden spoon or ladle for scooping soap into molds.
- To weigh out the lye, use an old plastic container.
- For water use a glass or plastic measuring cup.
- A medium or large pot for melting and combining the fats and oils.
- Immersion blender which you will use to bring soap to trace.
- Thermometer – you will use it to check the temps of the oils and the lye solution. Digital thermometers are best.
- You will need soap molds of some kind. Either use a shoe box lined with parchment paper, or get silicone or wooden soap molds. I borrowed a square box from one of my kids’ board games and lined it with baking paper. It worked great.
This may seem like a large list of supplies, but you likely have most of them already. When I started making soap I only needed to get a thermometer. The biggest consideration is to keep a separate spoon and cups for weighing and mixing the lye solution. You can wash everything else and use it in your kitchen as usual.
Pumpkin Spice Soap Step by Step
Measure out all the fats, oils, lye, and water so you are ready to proceed with the recipe.
Step 1
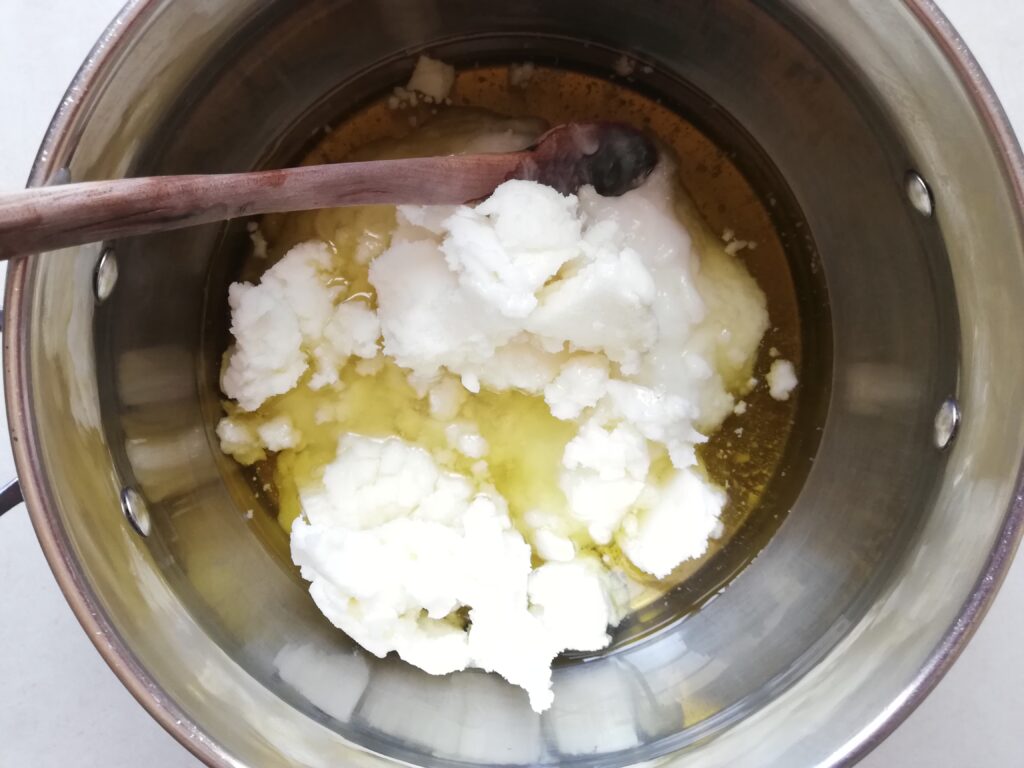
Place the tallow, coconut oil, olive oil and castor oil in a medium stainless steel pot. Turn the heat on medium low and heat the fats until completely melted. Once melted, take the pot off the heat.
Step 2
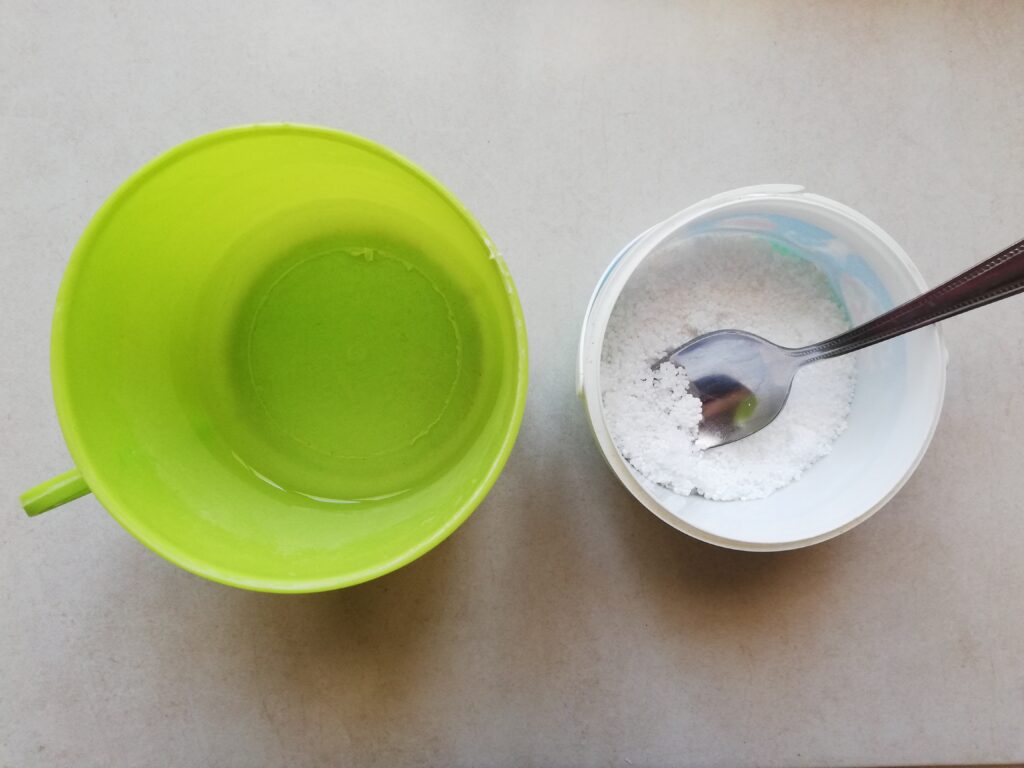
While the fats are melting, put on your glasses/goggles and rubber gloves and make sure you are wearing a long sleeved t-shirt. You will also need to wear a sturdy mask (or to hold your breath for about 20 seconds when adding lye into water). Either take your lye and water outside or stand by a wide open window. Slowly add the lye into the water while stirring and keep stirring until the lye completely dissolves.
Step 3
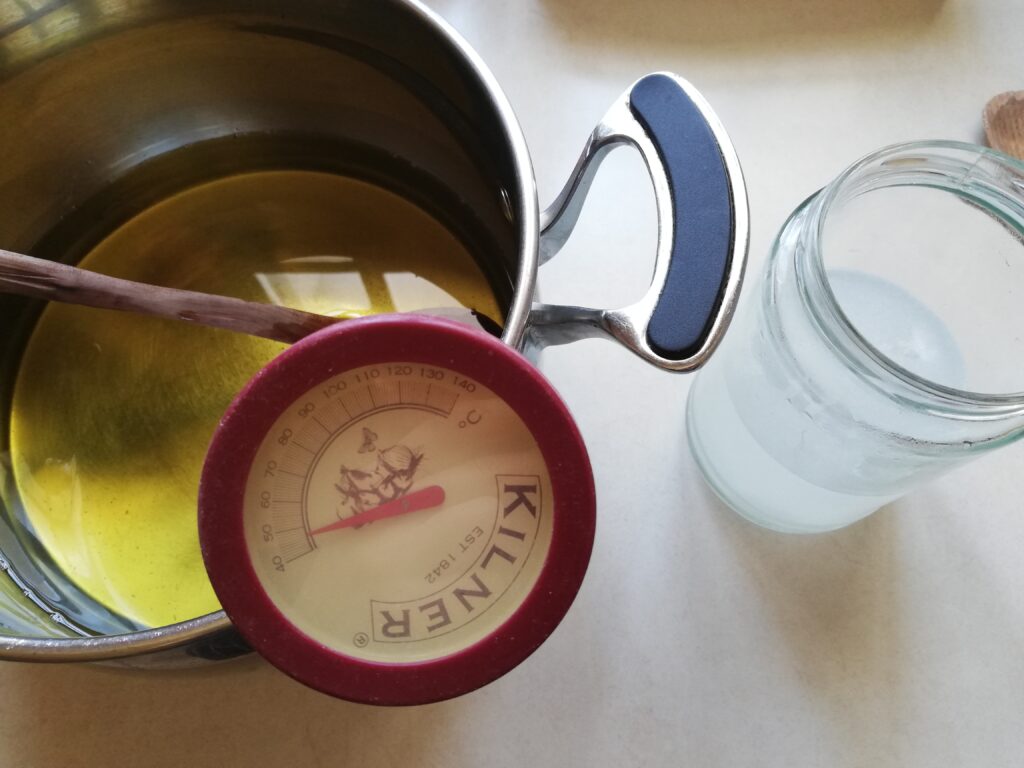
You will now need to let the oils and the lye solution to cool to 37°-43°C (100°-110°F). They do not have to be both the same exact temperature, as long as they are both in that temperature range or within less than 10 degrees of each other. It is best to have two separate thermometers and stick one in each container. If like me you only have one, wipe it well after each check so you don’t get any oil into lye water or vice versa.
NOTE: I moved the lye solution to a different container – that’s why it’s in a jar and not in a cup now (sorry about that!).
Step 4
My lye solution in a jar was cooling slower than the pot of oils (and the oils were almost the right temp) so I placed it in a bowl filled with ice-cold water and I stirred it a few times to speed up the cooling process. After just a few minutes it was about the same temperature as the oils (around 40°C/104°F) and ready to be mixed into the oils.
Step 5
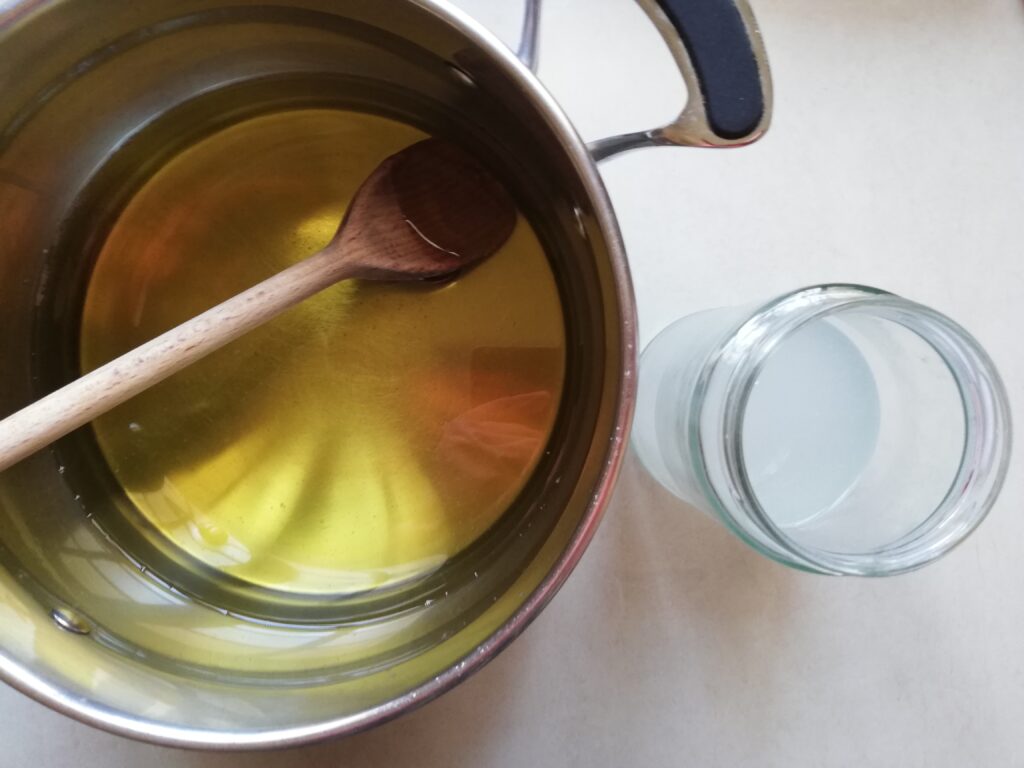
When both the oils in the pot and the lye solution in the jar have cooled to 37°- 43°C (100°-110°F), it is time to add the lye solution to the pot of oil. Slowly pour the lye into the pot with oils while stirring. You should see the oils thickening and becoming cream-colored immediately.
Step 6
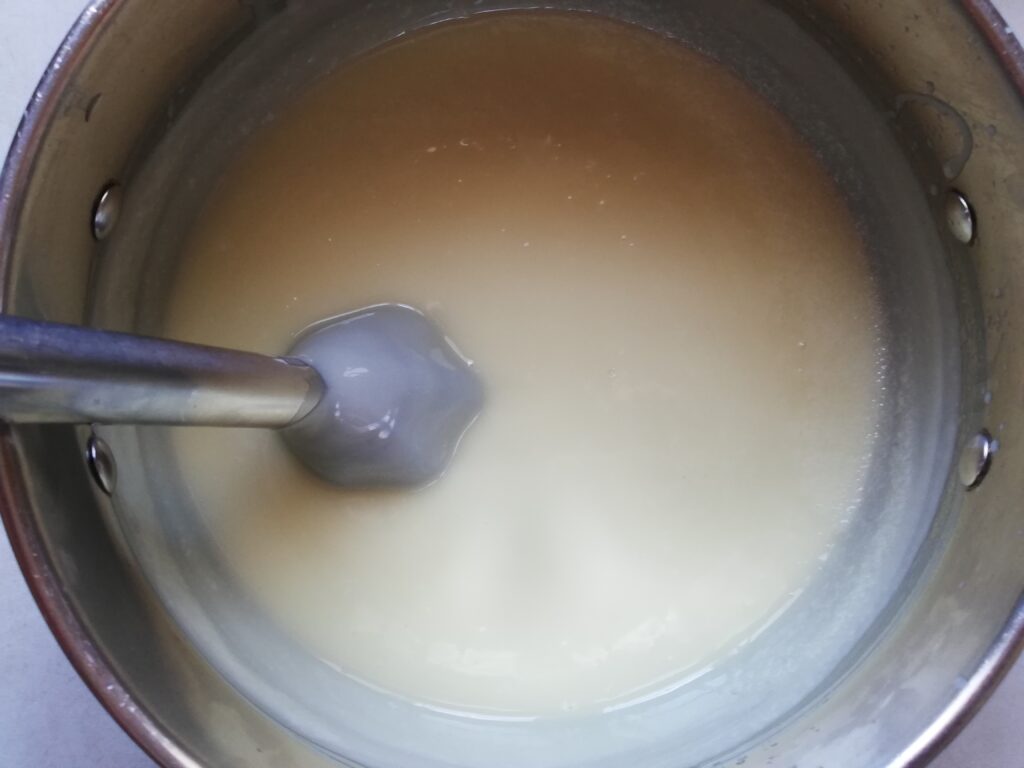
As soon as you have stirred the lye solution into the pot of oils, swap the spoon for the immersion blender and start blending the soap. You don’t have to blend all the time – blend for a few minutes on low to medium speed, then just stir with the blender for a few minutes, and repeat. You want to continue blending and stirring until your soap reaches medium trace.
Step 7
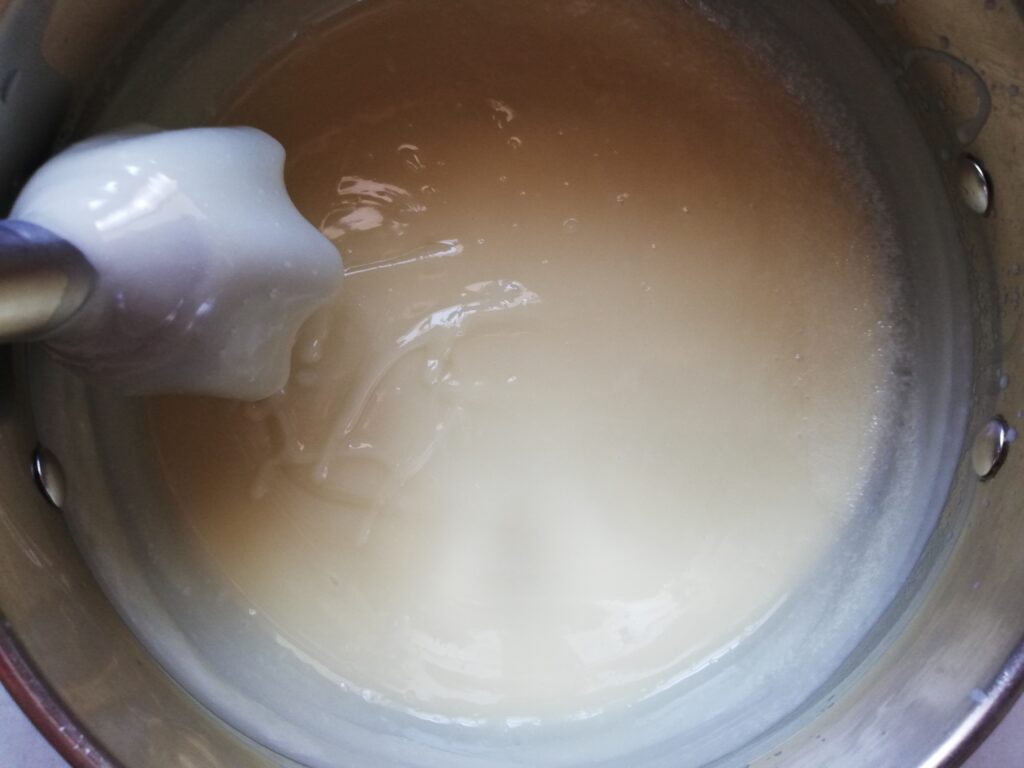
I have been blending and mixing the soap for about 15 minutes and my batter has reached medium trace. When I dribble a little of the mixture on top of the batter, I can see it leave a slightly raised trail. When this happens, it is time to add in the essential oils and the puree.
Step 8
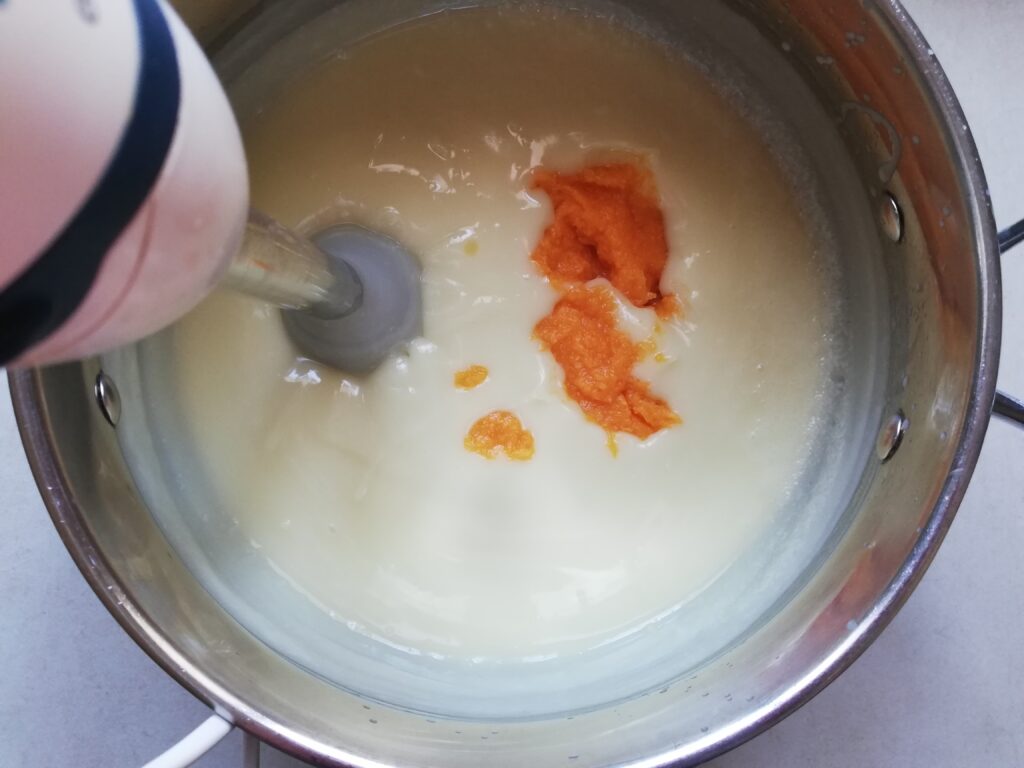
Add the cinnamon essential oil, cloves essential oil, and pumpkin puree and quickly blend them in for 20-30 seconds. Adding the puree and the oils will thicken the soap so you need to be quick.
Step 9

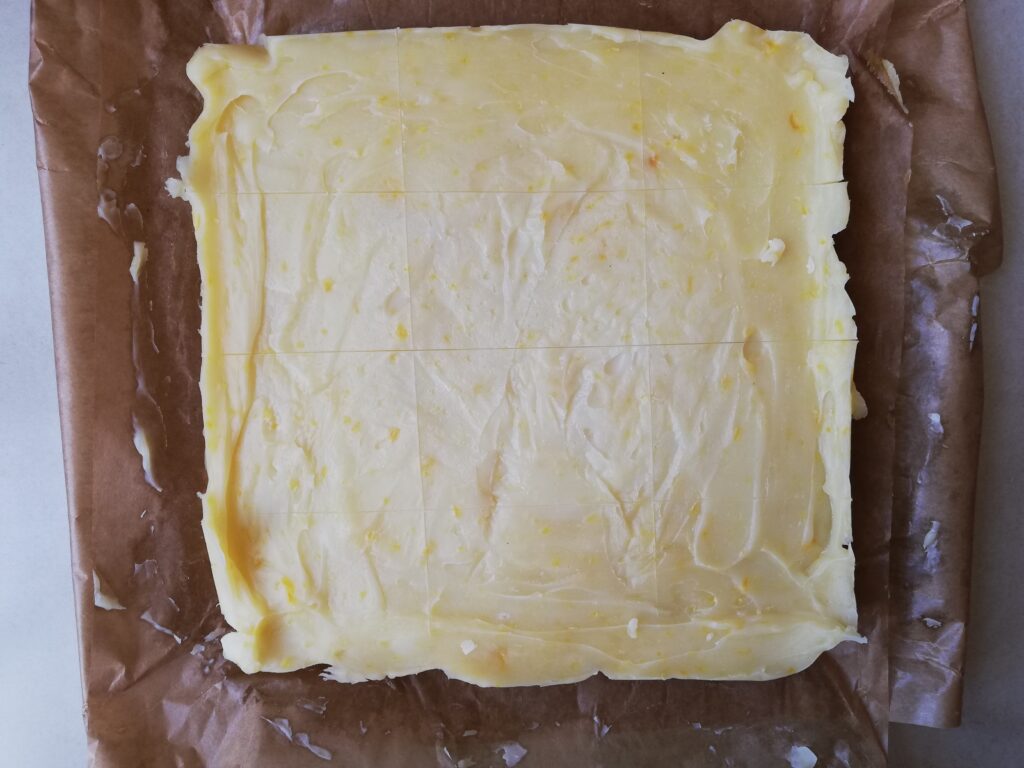
Pour the soap into the mold and spread it quickly with a spoon or spatula until the surface of the soap is flat and even.
Step 10
Cover the soap mold with plastic and place a couple of towels on top to insulate it. Leave it covered for 24 hours.
Step 11
After 24 hours have passed, it is time to uncover the soap and check if it has hardened enough to be removed from the mold and cut into bars. It took my soap 48 hours to harden enough for cutting. After the first 24 hours it was still soft so I covered it back with the plastic and the towels and left it for another day.
Step 12
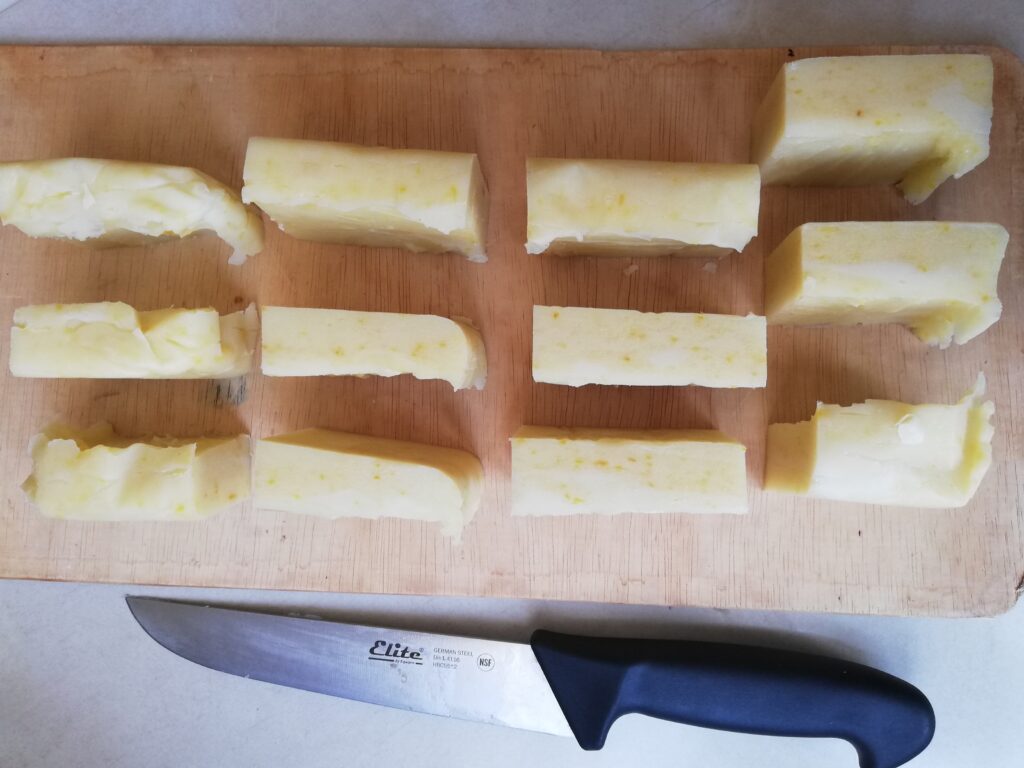
When your soap has had time to harden sufficiently, remove it from the mold and cut it into 12 bars with a large sharp knife.
Step 13
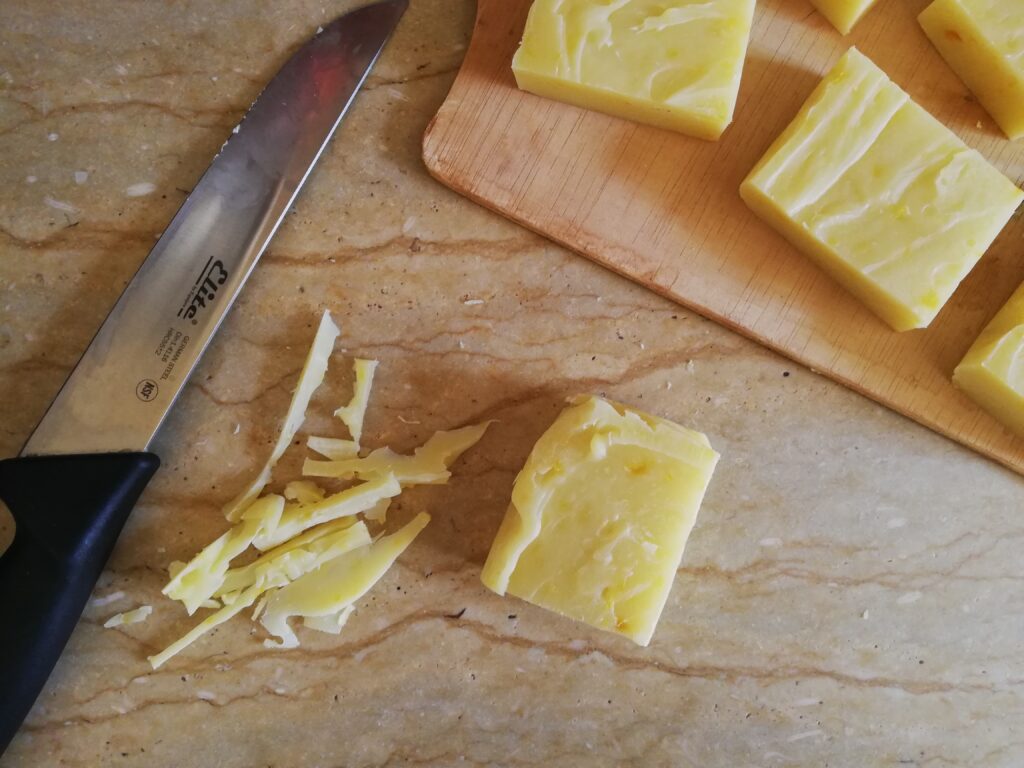
The bars which come from the corners of the mold may have some uneven edges. I trim some of them off but in general I don’t worry much about them – each bar is slightly different and unique as homemade bars of soap should be.
Step 14
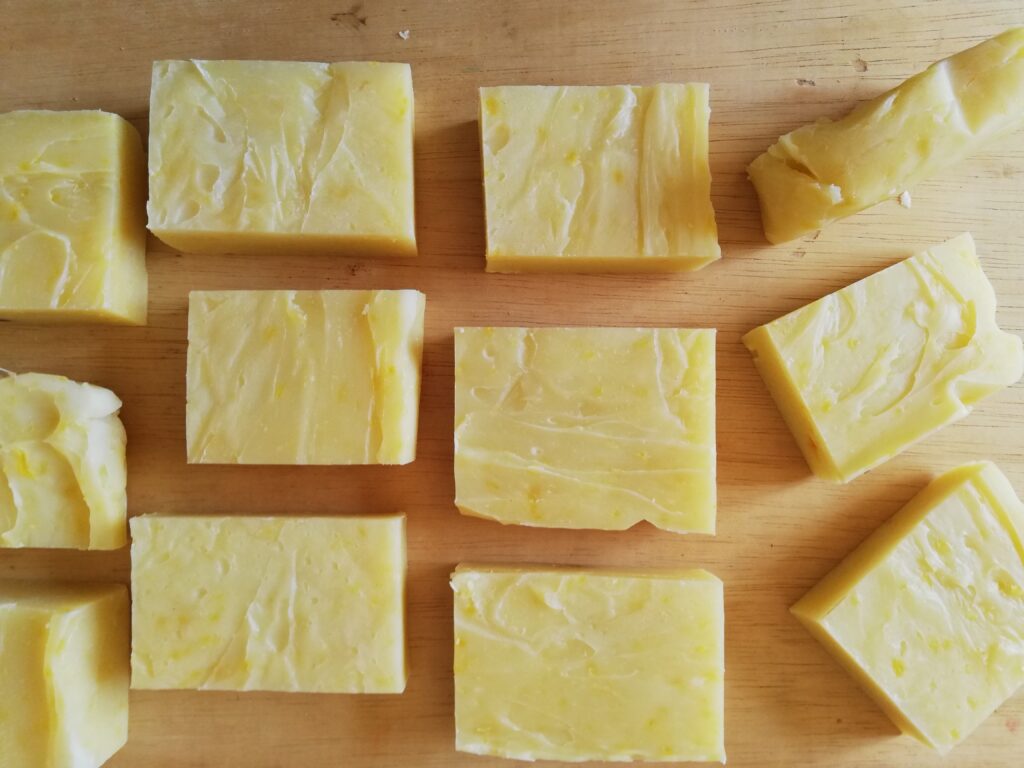
Because it is a cold process soap recipe, the bars will need to cure somewhere cool, with a good airflow and out of direct sunlight. Place the bars on a cookie cooling rack, a wooden board or a large piece of cardboard and let them cure for 4 to 6 weeks. Turn them once or twice during that time so they can cure more evenly. After the curing time is up your soap is ready to use or to gift!
Why Does Cold Process Soap Need to Cure for 4 to 6 Weeks?
While your pumpkin spice soap is technically ”done” after you have cut it into bars, waiting for it to cure for several weeks makes it into a much better product. Over the weeks some of the remaining water in the bars evaporates, making them harder, which helps them keep their shape and not turn mushy when used. As the water evaporates, the molecules in the soap become more concentrated, giving it a better lather. The soap’s pH gradually lowers, making it gentler on your skin as any remaining lye is neutralized during the first 2 weeks of curing time. Finally, curing helps the scents from essential oils and the natural colors in the soap to stabilize.
The minimum time for the soap to cure is 4 weeks but I recommend you wait the full 6 weeks if you want a really long-lasting, hard bar soap.
Can You Double a Soap Recipe?
Absolutely! You can double (or even triple) a soap recipe — you just need to recalculate all the ingredients so the ratios stay the same. The easiest way is to pop your oil amounts into a free online lye calculator (like this one) and let it give you the exact lye and water amounts for your new batch size.
The most important thing is precision. Soap making is a bit like baking — tiny changes can make a big difference. If the calculator says 4.35 oz of lye, measure exactly that amount — no rounding up “just a little.” The same goes for your oils, fats, and water. Accurate measuring means your soap will turn out safe, gentle, and just as lovely as the original recipe.
Quick tip: If you make soap often, keep a little notebook with your recalculated recipes — it’ll save you time next time you want a big batch!
Conclusion & Seasonal Inspiration
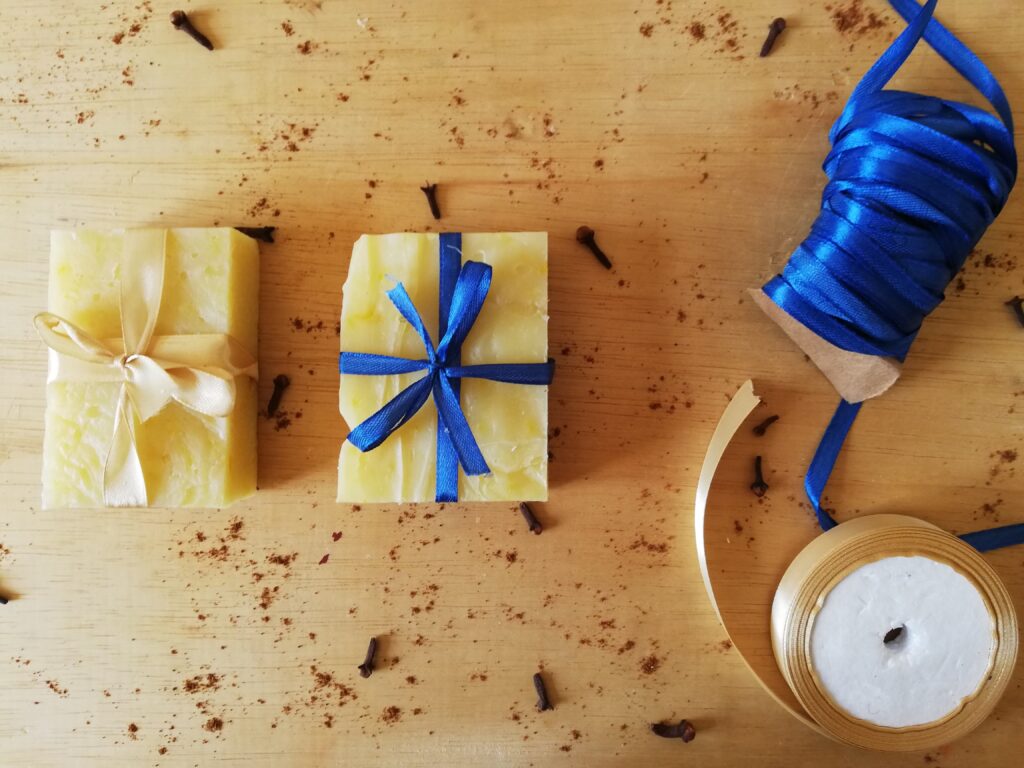
I hope you have as much fun making this beautiful pumpkin spice soap as I do. Be sure to make a few extra bars — they make wonderful gifts! Packaging homemade soap is simple, yet it can look absolutely spectacular. Try tying it with ribbons in colors that match the warm, golden tones of the soap, or go rustic with brown kraft paper and a bit of twine for a timeless, homestead-style touch.
Pumpkin Spice Soap
Equipment
- digital scale
- thermometer
- immersion blender
- measuring cup (for water)
- plastic cup or a small jar (for lye)
- medium or large pot (to melt fats)
- metal or wooden spoons
- rubber gloves
- glasses or protective goggles
- soap molds OR a shoe box lined with baking paper
Materials
- 11.55 oz tallow
- 9.90 oz coconut oil
- 9.90 oz olive oil
- 1.65 oz castor oil
- 10.50 oz water
- 4.50 oz lye (sodium hydroxide)
- 2 oz pumpkin puree
- 0.5 oz cinnamon essential oil
- 0.5 oz cloves essential oil
Instructions
- Place the tallow, coconut oil, olive oil and castor oil in a medium stainless steel pot. Turn the heat on medium low and heat the fats until completely melted. Once melted, take the pot off the heat.
- While the fats are melting, put on your protective clothing and a mask. Either take your lye and water outside or stand by a wide open window. Slowly add the lye into the water while stirring and keep stirring until the lye completely dissolves.
- Let the oils and the lye solution cool to 37°-43°C (100°-110°F). They do not have to be both the same exact temperature, as long as they are both in that temperature range or within less than 10 degrees of each other. It is best to have two separate thermometers and stick one in each container. If like me you only have one, wipe it well after each check so you don't get any oil into lye water or vice versa.
- Often you will find that either the oils or the lye solution cool faster. To make sure that they come to the right temperature at the same time, you can place either or both in a hot or cold bath.
- When both the oils in the pot and the lye solution in the jar have cooled to 37°-43°C (100°-110°F), it is time to add the lye into the oils. Slowly pour the lye into the pot of oils while stirring. You should see the oils thickening and becoming cream-colored immediately.
- As soon as you have stirred the lye solution into the pot of oils, swap the spoon for the immersion blender and start blending the soap. You don't have to blend all the time – blend for a few minutes on low to medium speed, then just stir with the blender for a few minutes, and repeat. You want to continue blending and stirring until your soap reaches light or medium trace (see notes below).
- Add the cinnamon essential oil, cloves essential oil, and pumpkin puree and quickly blend them in for about 20 seconds. Adding the puree and the oils will thicken the soap so you need to be quick.
- Pour the soap into the mold and spread it quickly with a spoon or spatula until the surface of the soap is flat and even.
- Cover the soap mold with plastic and place a couple of towels on top to insulate it. Leave it covered for 24 hours.
- After 24 hours have passed, it is time to check if the soap has hardened enough to be removed from the mold and cut into bars. If it still seems a bit too soft, re-cover it and leave to cure for another 24 hours.
- When your soap has hardened sufficiently, remove it from the mold and cut it into 12 bars with a large sharp knife.
- Because it is a cold process soap recipe, the bars will need to cure somewhere cool, with a good airflow and out of direct sunlight. Place the bars on a cookie cooling rack, a wooden board or a large piece of cardboard and let them cure for 4 to 6 weeks. Turn them once or twice during that time so they can cure more evenly. After the curing time is up your soap is ready to use or to gift!
Notes
- If you prefer an unscented soap, leave out the essential oils.
- Instead of or in addition to cinnamon and cloves essential oils you could use nutmeg or allspice essential oil. Make sure the total weight of the essential oils you choose is 1 ounce.
- For darker colored soap with pumpkin puree well blended in, add the puree into the soap at light trace. For lighter colored soap with darker amber specks of pumpkin still visible, add the puree at medium trace.