How to Make Lacto Fermented Carrots with Ginger (Easy Gut-Healthy Snack)
Lacto fermented carrots with ginger are one of the easiest and fastest ferments you can make at home. Their natural sweetness makes them a family favorite—especially with children who may be hesitant about tangier ferments like sauerkraut. These crunchy, colorful carrot sticks not only brighten up any plate but also deliver a boost of probiotics. In this post, I’ll teach you how to make fermented carrots, how to tell when they’re ready, the best ways to store them, and how to avoid common mistakes that beginners often make.

What Are Fermented Carrots?
Fermented carrots are raw carrots that have been put into 2 % salt brine for a few days until the beneficial bacteria have had time to work on them, making them softer and slightly sour, and of course colonized by the beneficial bacteria themselves, resulting in a slightly tangy and delicious side dish you can serve with about anything.
The Difference Between Pickling and Fermentation
Pickling is preserving foods (usually vegetables and fruit) with vinegar which creates a PH environment in which bacteria cannot develop. The end result is food that has been preserved from spoilage. It is not fermented food as the vinegar has created a sterile environment in which bacteria cannot multiply, whether they are beneficial or otherwise.
When you ferment vegetables, you use just enough salt to prevent harmful bacteria (those that can cause food to spoil or you to get food poisoning) from proliferating while encouraging beneficial bacteria to develop and colonize the food, bringing a multitude of benefits, such as enhancing the flavor of the fermented foods, increasing the nutrient content of the food in the jar, and feeding your own beneficial gut bacteria.
It’s important to remember that while properly pickled and canned food can be stored in the pantry, fermented foods need to be stored in the fridge. Unless you have a really cool cellar that can keep your ferments at around the same temperature as a refrigerator would. If stored at room temp, you fermented foods would keep on fermenting until they would get mushy and unappetizing.
What Do They Taste Like?
Fermented carrots are slightly crunchy, slightly sweet and just pleasantly sour. In my opinion they taste much better than pickled vegetables in which the vinegar flavor can be quite overpowering. They are so mild tasting in fact that you can be eat them on their own. You can also drink the brine they are in or add it to salad dressings or to a bowl of soup. My kids like to sip the brine while they eat their dinner!
Fermented Carrots Benefits – Why They’re Good for You
Fermentation is a world-wide practice with many health benefits. The first benefit it confers is that it increases the amount of certain nutrients, especially B vitamins. The second is that the beneficial bacteria in the fermented foods populate you gut and make your gut flora better, more balanced – and keep the less desirable bacteria at bay. Fermented foods also help you digest the food you eat because of their enzymatic content (fermented foods are beasically predigested foods). Finally, lacto fermented veggies just taste really good and make the food you serve alongside them taste better in turn. My children don’t like raw or cooked carrots or cabbage, but they do like them fermented. And they love to drink the brine from the fermented carrots. What a great way to get your kids to eat at least some of their veggies!
Ingredients
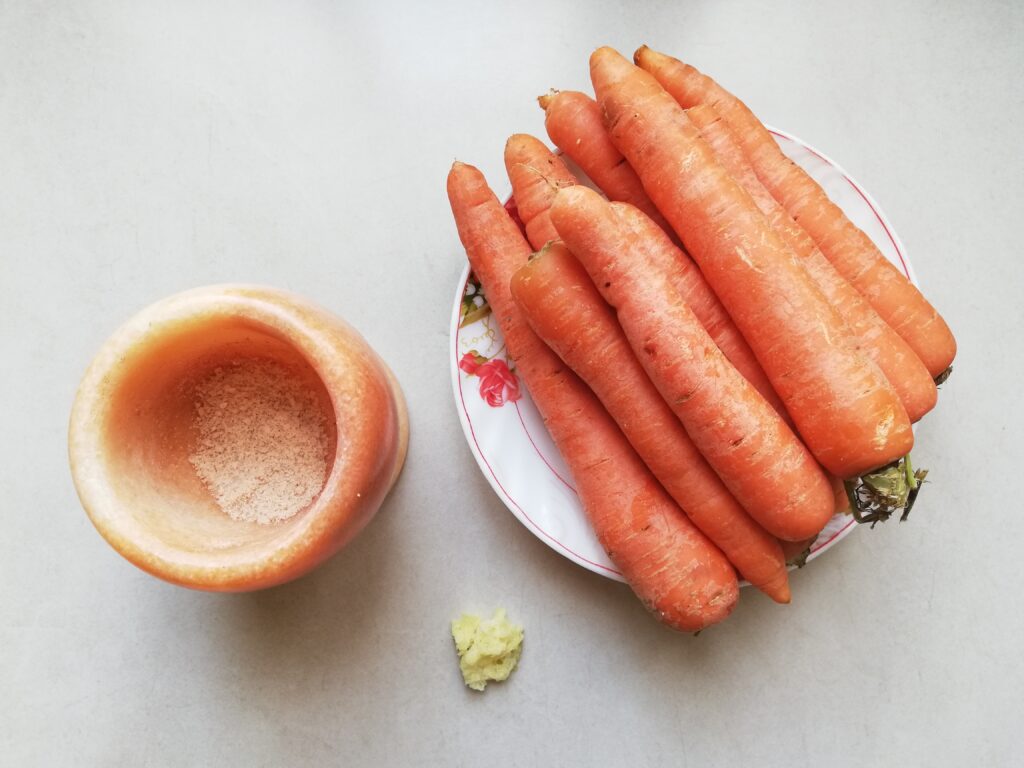
- 1kg / 2.2 lbs carrots, well-scrubbed (no need to peel them)
- 2 teaspoons fresh grated ginger
- unrefined salt
- filtered water
You will also need two 500ml jars with lids or one 1 liter / 1 quart jar with a lid. You do not need to use new lids for this project as long as your lids are still in good condition (not damaged or scratched). European style one part lids (like the ones I use in the photos) or American two part lids are both fine.
I also recommend having a digital scale to weigh the salt and water for the brine. Alternatively, you can use teaspoon and cup measurements.
Making Fermented Carrots Step By Step
Step 1

First scrub your carrots well under running water. There is no need to peel them unless they have blemishes. Then you need to top them and cut them into sticks.
Step 2
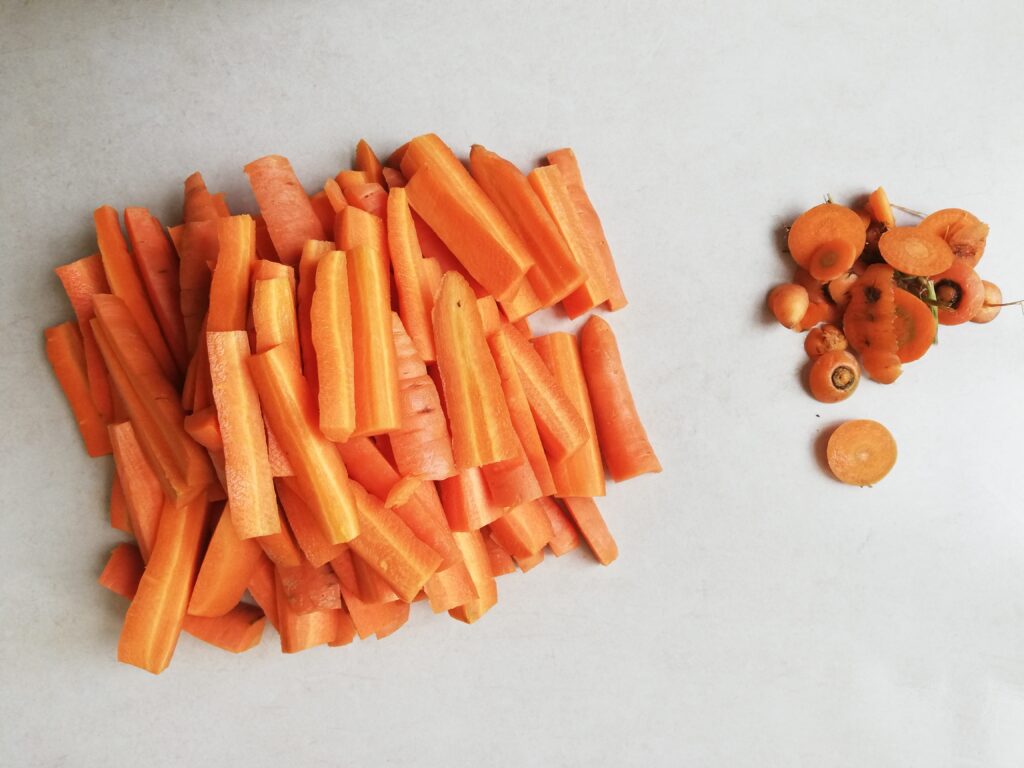
You want all your carrot sticks to be of similar size. There is no need to obsess over this – just don’t make some of them huge and some tiny. As you can see in the photo above, mine are not all perfectly the same. Being of similar size, they will ferment at a similar rate – which is what we want.
Keep the carrot tops to use in stock if you like.
Step 3

Time to pack the carrot sticks into jars. First to go in is the fresh grated ginger – if you put it in last it would just float to the surface of the brine. When you add it in first, the carrots keep it down at the bottom of the jar where it belong. Stand all the carrot sticks upright in the jar to create the first layer. Pack as many as you can. Use some muscle as you do this – you need to pack them TIGHTLY so they don’t all float to the surface when they start fermenting and lose some of their firmness.
Step 4

Add the second layer of carrots into your jar. This time there will be less standing room in your jar so you may have to pack some of the longer pieces horizontally. Again pack tightly and pack as many as you can squeeze in. Make sure to stop when you reach the neck of the jar, keeping the rim empty.
Step 5
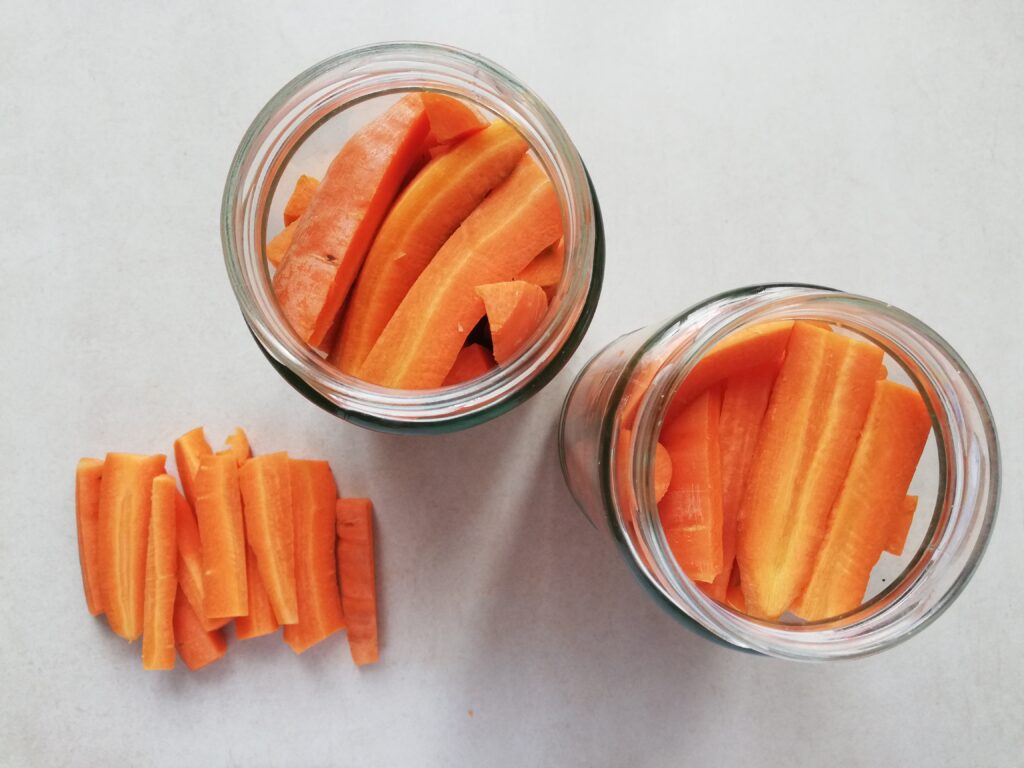
Repeat the packing process with the second jar. You may end up with some carrot sticks left, like I did. You can put them in a little jar if you have one. Or keep them for other uses. I ate mine up as I was finishing this recipe.
Step 6
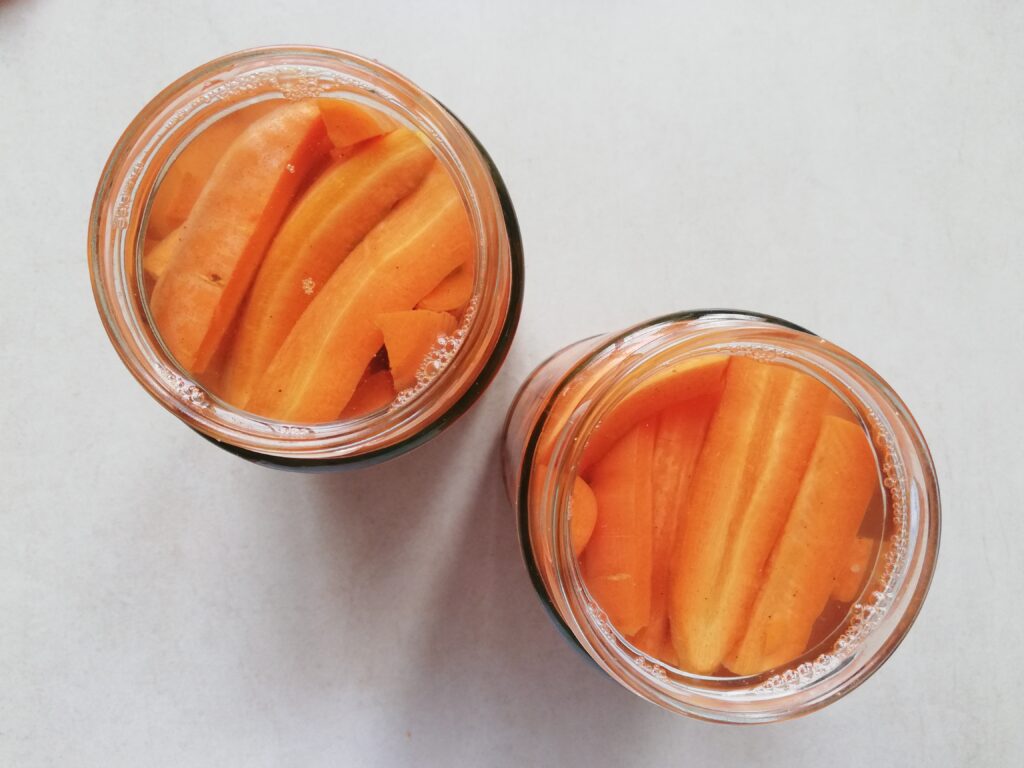
After you have packed the carrots into the jars, it is time to mix the brine. Weigh 10 grams (1 3/4 teaspoons) of unrefined salt and mix it into 500ml / 2 cups filtered water until fully dissolved. Do not use table salt as it contains ingredients which could interfere with the fermentation process.
Pour the brine over the carrots up to the rim of the jar (leaving no air space in the jar). If you need some more brine, mix 1 cup water with 1 scant teaspoon of salt and add to the jars. If you only need a little bit of water to complete filling the jar, just add it in without mixing in any salt. Such a small amount won’t skew the salt/water ratio significantly.
The carrots should be under the brine. If any starts to float to the top, push it back in firmly or add an extra stick or two to pack them more tightly. Anything floating on top, whether it’s a carrot stick or a piece of ginger, tends to get moldy, so you don’t want any floaters in your jar.
Step 7
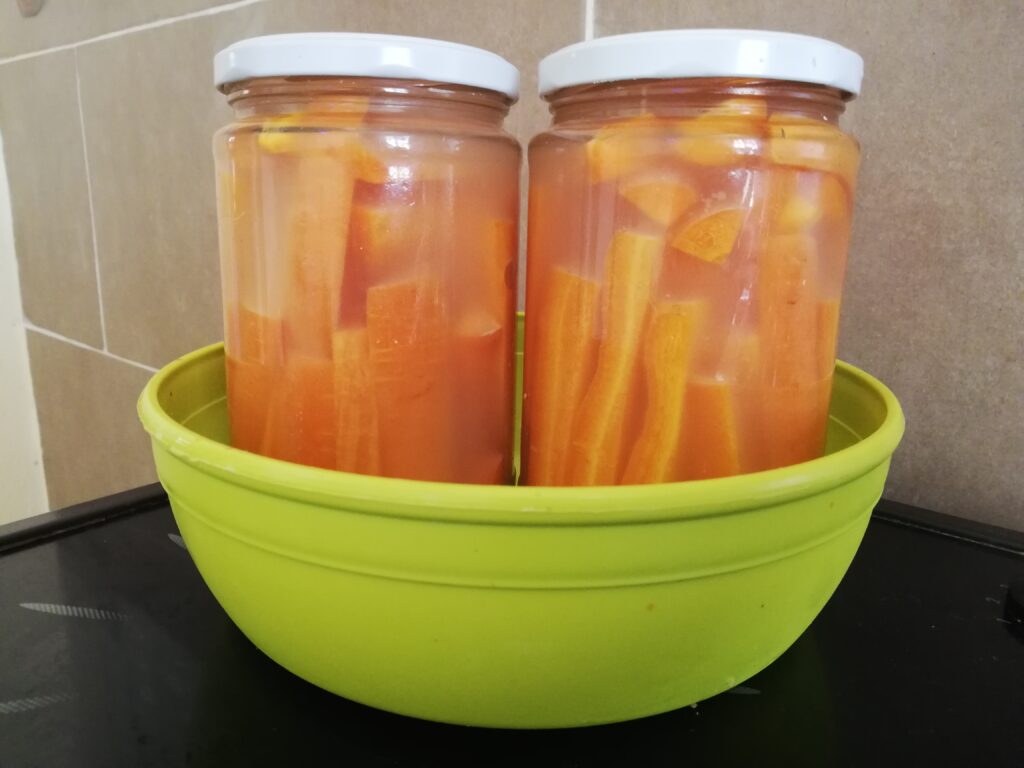
Screw the lids on TIGHTLY and set the jars in a plastic container or a bowl. After a day or two some of the brine may leak out of the jars (this is called ‘siphoning off’) – this usually stops after a couple of days and then the bowl can be removed. Also remember to label the jars with the date of preparation. I usually write the date with a permanent marker on the lids.
There is no need to ‘burp’ the jars – which means to unscrew the lids for a moment to release some of the fermentation gases. Both the one piece lids I use and the American two piece lids allow the extra gases to escape. The jars will not explode.
Step 8

A few days have passed and the carrots are ready! Once they have fermented enough, it is time to transfer them to the refrigerator for long term storage.
I go into detail about how to judge if they are ready and how to safely store them in the sections below so keep reading!
How Long to Lacto Ferment
Because carrots contain quite a bit of naturally occuring sugars, they are one of the quickest ferments you can make. If your kitchen is very warm they may only need 3 days to fully ferment. If it is winter they usually take 7-10 days in a cool kitchen. I made this particular batch in June and they were ready on day 6. Set a reminder on your phone or write a note in your calendar so you don’t forget to check on them on time. Because they are quick to ferment, the carrots are also quick to overferment even if you only forget them for a couple of days too long.
If your kitchen is very warm, start checking on them on day 3. If it is moderately warm, start on day 5. In winter, check for the first time on day 7. If they are not ready yet when you check, screw the lid back on tightly and check again after a day or two.
How do you know when they are ready? They should be slightly softer than raw carrots but still with a nice crunch to them, slightly sour and slightly sweet, with a mild gingery flavor. They should not taste overly salty. The brine will not be clear anymore, but slightly cloudy / milky in color – this is normal. If your carrots taste and look like what I’ve just described, transfer them to the refrigerator straight away.

How to Know If Fermented Carrots Are Bad
Botulism is not a concern with lacto fermented carrots. The main problem you may have is mold. To prevent any mold problems:
- use the correct ratio of salt to water in the brine,
- keep everything under the brine (no floaters),
- fill the jar with brine up to the rim (don’t leave any room for air)
- screw the lid on TIGHTLY.
If you messed up with any of the above and the carrots have gone bad, you will notice that straight away. There will be mold on top, or the carrots will just smell and taste rotten. Throw them away into the compost and try again.
If there is no mold or bad smell or taste but the carrots are really soft and mushy, they are most likely not bad, only overfermented – you left them on the counter for too long. They won’t be unsafe to eat, but they will be mushy and unappetizing. It’s probably best to compost them and try again. Don’t get discouraged, it happens to everyone. I still sometimes forget about my ferments when life gets busy. That’s why I usually try to set alarms for certain days, so I don’t forget about checking on them and end up with mushy carrots or kraut.
How to Store Fermented Carrots + Shelf Life
- When they are fermenting, keep them somewhere warm and dry, out of direct sunlight.
- When they have fermented at room temp for a few days and are ready to eat, store them in the refirgerator or in a very cool, dry cellar at around 5°C/ 41°F.
- I have kept my lacto fermented carrots in the refirgerator for months at a time and they have never gone bad. To err on the side of caution aim to consume them within 6 months. Once you start eating from a jar, try to use it up within a couple of weeks – if the jar is partly empty or the brine does not fill the whole jar any more, the risk of mold is higher.
- I have heard about some fermenters deliberately increasing the salt to water ratio in their brine to make their ferments last really long at room temp. I have not experimented with that myself so cannot offer any advice on this. The brine those fermenters used to improve long term storage is 5–5.5%, which is quite a bit higher than the ratio usually used in ferments.
What Are Fermented Carrots Good For? (Serving Suggestions)
- These carrots are so delicious and mild tasting that you can eat them straight out of the jar!
- They are also great as a side dish, served with meats or fish.
- They make a good accompaniment to savory breakfasts or lunches.
- Add them to salads or wraps, either whole or chopped into smaller pieces.
- The brine is also yummy – add it to salad dressings or to bowls of soup for a probiotic boost. Or sip it on its own – it will help you digest your dinner!
Conclusion
I hope you love this easy lacto fermented carrots with ginger recipe! It is quick and so nutritious. Moreover, it does not require any fermentation weights, air locks, or any of that gear. When I started fermenting vegetables, fermented carrots were the second recipe I tried (the first one was sauerkraut). I have been making them more or less regularly ever since. Give this recipe a try, and if you have any questions – drop them in the comments!
I would love you to subscribe to my newsletter and share this recipe on Pinterest as well!

Easy Lacto Fermented Carrots with Ginger
Equipment
- 2 x 500ml jars with lids OR 1 x 1000ml / 1 quart jar with lid
Ingredients
- 1kg / 2.2 lbs carrots, well scrubbed (no need to peel them)
- 2 tsp fresh grated ginger
- 10 grams unrefined salt
- 500ml / 2 cups filtered water
Instructions
- First scrub your carrots well under running water. There is no need to peel them unless they have blemishes. Then top them and cut them into sticks.You want all your carrot sticks to be of roughly similar size.
- Add the fresh grated ginger into your jar. Then add the first layer of carrots into the jar – put them in standing upright if you can. It is important to pack them into the jar tightly so they don't all float to the surface of the brine once they start fermenting.
- Add the second layer of carrots into your jar. This time there will be less standing room in your jar so you may have to pack some of the longer pieces horizontally. Again pack tightly and pack as many as you can aqueeze in. Make sure to stop when you reach the neck of the jar, keeping the rim empty.
- Repeat the packing process with the second jar. You may end up with some carrot sticks left. You can put them in a little jar of their own if you have one. Or keep them for other recipes.
- After you have packed the carrots into the jars, it is time to mix the brine. Weigh 10 grams (1 3/4 teaspoons) of unrefined salt and mix it with 500ml / 2 cups filtered water until the salt is fully dissolved.
- Pour the brine over the carrots up to the rim of the jar. If you need some more brine, mix 1 cup water with 1 scant teaspoon of salt and add to the jars. If you only need a little bit of water (less than 1/4 cup) to complete filling the jar, just add it in without mixing in any salt. Such a small amount won't skew the salt/water ratio significantly.
- The carrots should be under the brine. If any starts to float to the top, push it back in firmly or add an extra carrot stick or two to pack them more tightly. Anything floating on top, whether it's a carrot stick or a piece of ginger, tends to get moldy, so you don't want any floaters in your jar.
- Screw the lids on TIGHTLY and set the jars in a plastic container or a bowl. After a day or two some of the brine may leak out of the jars (this is called 'siphoning off') – this usually stops after a couple of days and then the bowl can be removed.
- It takes between 3 and 10 days for the carrots to ferment, depending on how warm your kitchen is. They should be slightly softer than raw carrots but still with a nice crunch to them, slightly sour and slightly sweet with a mild gingery flavor. They should not taste overly salty. The brine will not be clear anymore, but slightly cloudy / milky in color. If you have tasted the carrots and they are not yet ready, screw the lid back on tightly and leave them to ferment for another couple of days.
- Once they have finished fermenting, transfer your lacto fermented carrots to the refrigerator for long term storage.
Notes
- Store these lacto fermented carrots in your refrigerator for up to 6 months. Once opened, use up the jar within 14 days.
- Serving suggestions: eat them on their own as a snack, add to salads and wraps, serve alongside meat and fish dishes, use as a side to a savory breakfast, or serve with dips.
- It is important to use unrefined salt (not table salt) and filtered water in this recipe for best results.
- There is no need to ‘burp’ the jars – which means unscrewing the lids for a moment to release some of the fermentation gases. Both the one piece lids I use and the American two piece lids allow the extra gases to escape. The jars will not explode.


