How to Make Probiotic Fermented Carrots with Garlic and Dill
These fermented carrots with garlic and dill are crisp, tangy, and downright addictive. They’re perfect as a quick probiotic snack straight from the jar or served as a flavorful side with any meal. If you enjoy classic dill pickles, you’ll love this carrot and dill twist. And if you’re just starting out with vegetable fermentation, this easy recipe is the perfect place to begin. They’re also a huge hit with my kids—jars of these carrots disappear from our kitchen in just a couple of days!

Can Carrots Be Fermented?
Carrots ferment beautifully thanks to their natural sweetness, which provides plenty of food for the beneficial bacteria. The result is a pleasantly tangy flavor with a satisfying crunch. Fermented carrots are also one of the easiest probiotic snacks to introduce to kids—even those who can be hesitant about trying new foods usually enjoy them.
Do Carrots and Dill Go Together?
Before I started making these garlic and dill lacto-fermented carrots, I thought dill belonged only in pickles or cucumber soup. The first time I tried this recipe, I played it safe and made just one small jar in case no one liked it. To my surprise, that jar disappeared in a single sitting—my kids devoured the carrots and immediately asked me to keep making them this way!
If you’re a pickle lover, you’ll adore these garlic and dill carrots too. And if you’re new to fermenting vegetables, this recipe is the perfect place to start. These fermented carrots are wonderfully refreshing—the natural sweetness and crunch of the carrot paired with the tangy dill pickle flavor make them a side dish you’ll want to serve with everything.
Tips for Making This Recipe
- You can use any unrefined salt you like in this recipe – rock salt, sea salt, pink Himalayan salt etc. Any salt with additives such as anti-caking agents should not be used in fermentation recipes.
- You do not need to peel the carrots unless you really want to. If they are a bit grubby, give them a good scrub under running water.
- I use regular jars with lids for all of my fermenting. Both two-piece American lids and one-piece European style lids are fine to use. I have never bothered to invest in crocks, jars with air-locks etc., because regular mason jars work very well. This way I can use the same type of jars for fermenting, canning, and storing leftovers which is important to me as in most places where we’ve lived kitchen space was limited.
- Instead of 2 pint jars you could use 1 quart jar.
- This recipe is super easy to double or even triple. Make sure that you use the correct ratio of salt to water in your brine – 20 grams of salt per liter or 2 tablespoons of salt per 4 cups of water.
- Pack the carrot sticks tightly into jars. Use some muscle power when you do this. They will lose some moisture as they ferment and may start floating up if not packed tight enough, which predisposes them to getting moldy.
- Instead of dill seeds, you could use dill leaves or fresh dill heads in this recipe. Place them in the jars before you add in the carrots.
Ingredients & Tools You’ll Need

Step-by-Step: How to Make Lacto-Fermented Carrot Sticks

First cut the carrots into sticks. Don’t worry about having them all the same length. They should be roughly the same thickness so they ferment at a similar rate.

After you have prepared all the carrots, place the dill seeds and the peeled garlic cloves into the jars. I like to put them in before carrots, so they are less likely to float to the top once the jars are filled with brine.

Now fill the jars with some of the longer carrots sticks. Stand them upright. Use some muscle and pack them tight, so they don’t float up once the jar is filled with the brine. They should not stick out above the neck of the jar – if some of them are a bit too long, cut them shorter. You can tuck the short pieces into any small gaps in the jars.

If there is still a little room in the jars, add a few of the shorter sticks horizontally. Make sure nothing reaches above the neck of the jar.

Prepare the brine by mixing 10 grams (1 tablespoon) of salt with 500ml (2 cups) filtered water. Stir until all the salt has dissolved.

Fill both jars to the brim with the brine – I mean literally to the brim. Don’t leave any air space. If you need a little more brine, mix some more salt and water in the ratio of 1/2 tablespoon of salt to 1 cup of water. If you only need a couple of spoons of brine, just add plain water without worrying about calculating such small amounts of brine. Adding such a small amount of water will not skew the ratio enough to cause any issues.

Screw the lids on tight and place the jars on your counter or somewhere where you can keep an eye on them. After the first 24 hours have passed, the jars are likely to start hissing and may leak some brine. Place them in a bowl or a tray so they don’t make a mess on your counter. There is no need to ‘burp’ the jars.
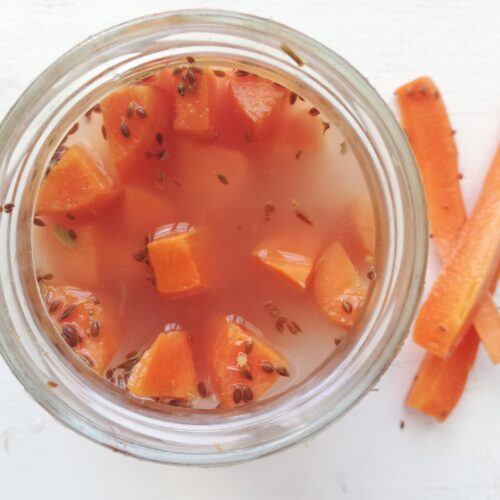
As the carrots ferment, the brine will turn from clear to cloudy. This is a perfectly normal occurence and not a sign of spoilage.

These carrots will take about 4 days to ferment if your kitchen is very warm or 6 – 7 days in a cool kitchen. To check if they are ready, open a jar and take a carrot stick out. If it is softer than a raw carrot but still with a nice crunch to it, it is ready. You can then transfer both jars to the fridge.
Because carrots are quite high in sugar, they can get quite fizzy and foam when you open the jar. It only happens sometimes, but to be on the safe side, open any new jar over the sink or a bowl to catch any overflow.
Troubleshooting
The most common issue people face when fermenting vegetables is mold. Fortunately it is easy to prevent mold in fermented vegetables if you follow correct fermentation practices.
- Use the correct salt to water ratio in your brine. For carrots (and many other ferments such as sauerkraut) this ratio is 20 grams (2 tablespoons) of salt per 1 liter (4 cups) of water.
- Make sure that everything is submerged under brine at all times. The dill seeds will float, that’s okay. The garlic and carrots however should stay under the brine.
- Fill the jars with the brine to the brim. Some of it may leak out during the fermentation process – that is fine, you do not need to refill the jars with more brine.
- Once the jars are filled with the veggies and the brine, screw the lids on tight.
- Do not open the jars until you are ready to eat the carrots. The jars will seal themselves as they ferment, pushing any remaining air out. When you open them, you break that seal and let the air in. If you have opened a jar to test whether the carrots are ready for eating, just store that jar in the fridge and it will be fine.

Storage & Shelf Life
- After having fermented at room temp for 3 – 7 days, these carrots should be stored in the refrigerator. If you continued to keep them on the counter, they would eventually overferment and get mushy. They would not be unsafe to eat, but they would be completely unappetizing.
- These fermented carrots will keep in the fridge for several weeks. Being refrigerated slows down fermentation, but does not completely stop it so I recommend you use them up within a month or two, otherwise they may eventually lose their nice crunch.
- Make sure to use up any opened jar within a week or so, otherwise the carrots may get moldy.
Recipe FAQs
Conclusion
I hope you’ll give these delicious fermented carrots a try! If you do, let me know in the comments below—I love hearing how these recipes turn out in your kitchen. Fermentation really shows how a few simple ingredients can transform into something spectacular. With just carrots, garlic, dill, salt, and time, beneficial bacteria create a side dish that’s as nourishing as it is tasty. I’m a big fan of lacto-fermentation, and you’ll find many more easy fermented food recipes here on the blog to inspire your next batch.
More Delicious Fermented Recipes
Red Cabbage Sauerkraut with Orange and Cloves
Fermented Carrots with Garlic and Dill
Equipment
- 2 pint (500ml) mason jars with lids OR 1 quart jar
Ingredients
- 700g (1½ pounds) carrots
- 2 tsp dill seeds
- 4 garlic cloves
- 10g (1 tbsp) unrefined salt
- 500ml (2 cups) filtered water
Instructions
- Start by cutting the carrots into sticks. They don’t need to be exactly the same length, but aim for a similar thickness so they ferment evenly.
- After you have prepared all the carrots, place the dill seeds and the peeled garlic cloves into the jars. I like to put them in before carrots, so they are less likely to float to the top once the jars are filled with brine.
- Next, fill your jar with the longer carrot sticks, standing them upright. Pack them in firmly so they don’t float once the brine is added. Make sure none of the sticks rise above the jar’s neck—trim any that are too tall, and tuck the shorter pieces into the gaps.
- If there’s still space in the jar, add a few shorter carrot sticks horizontally. Be sure nothing extends above the neck of the jar.
- Prepare the brine by mixing 10 grams (1 tablespoon) of salt with 500ml (2 cups) filtered water. Stir until all the salt has dissolved.
- Pour the brine into the jars, filling them right to the brim with no air space. If you run short, mix more brine using ½ tablespoon of salt per 1 cup of water. If you only need a spoonful or two, simply top up with plain water—the small amount won’t affect the fermentation.
- Screw the lids on tightly and place the jars on the counter where you can check on them. After 24 hours, the fermentation will usually become active—the jars may hiss or leak a little brine. Set them in a bowl or tray to catch any overflow. There’s no need to “burp” the jars.
- Ferment the carrots for about 4 days in a warm kitchen, or 6–7 days if it’s cooler. To check if they’re ready, open a jar and taste a carrot stick—it should be slightly softer than raw, but still crisp and crunchy. Because carrots are naturally high in sugar, they may sometimes get fizzy and foam when you open the jar. To be safe, open new jars over the sink or a bowl to catch any overflow.
- Transfer the jars to the refrigerator for long term storage.
- Enjoy these fermented carrots as a crunchy probiotic snack, add them to salads and sandwiches, or serve them alongside meats, cheese boards, and family meals.
Notes
- Standard ratio: ½ tablespoon salt per 1 cup water.
- Scale up or down as needed to fill your jars.
- If you only need a spoonful or two extra, just top up with plain water—the small amount won’t affect fermentation.
- Warm kitchen: ~4 days
- Cool kitchen: 6–7 days
- Ready when carrots are tangy, slightly softened, but still crunchy.