How to Prepare Chicken Livers (Step-by-Step Guide)
If you’ve ever walked past chicken livers at the store wondering, “What do I even do with those?”—you’re not alone. In this post, I’ll show you exactly how to prepare chicken livers so they’re simple to work with and easy to cook with confidence.
From how to clean and freeze chicken livers to tasty, family-friendly ways to use up leftovers, you’ll find answers to the most common questions about preparing and cooking liver at home.
Chicken livers may be underrated, but they’re incredibly budget-friendly, packed with nutrients, and surprisingly delicious when prepared properly. With a few simple steps, you can turn this humble ingredient into something your whole family will enjoy.
What Are Chicken Livers?
Chicken livers are the edible organs of chickens, long prized in traditional cultures around the world for their exceptional nutrient density. When learning how to prepare chicken livers, it helps to understand just how nourishing they are.
Organ meats are far more nutrient-dense than muscle meats, and liver in particular is a true nutritional powerhouse. Chicken livers are especially rich in vitamin A, vitamin B12, folate, riboflavin, iron, and selenium—making them one of the most affordable and nutrient-packed foods you can serve your family. For me, this is the main reason I try to serve liver at least once a month. While there are many cuts of meat my family enjoys more than liver, nothing compares when it comes to nutrient density. Learning how to prepare chicken livers in a way that’s tasty and approachable makes it easy to include this powerhouse food in our meals regularly.
What Do Chicken Livers Taste Like
Chicken livers have a mild flavor and are easy to work with, which makes them a great starting point if you’re learning how to prepare livers at home. They can be sliced and added to stir-fries, blended into smooth pâtés, or quickly sautéed for simple sandwich fillings. Their flavor is often described as rich and slightly earthy.
In our home, we also enjoy calf and lamb liver on occasion, but chicken livers are by far the mildest and most tender—making them especially well-suited for beginners. While some people love liver right away, for many it’s an acquired taste. After all, most of us didn’t grow up eating liver, and its flavor is quite different from more familiar cuts like chicken breast or drumsticks.
If you’re unsure whether you’ll enjoy them, a few simple preparation steps can make all the difference. Try soaking chicken livers in milk or buttermilk for about 30 minutes before cooking to help mellow the flavor. Cooking them with plenty of seasoning also helps—fresh onions, garlic, and herbs like sage pair beautifully and make liver dishes much more approachable.
Are Chicken Livers Good for You?
Absolutely! They are true nutritional powerhouses, packed with vitamin A, vitamin B12, folate, riboflavin, iron, and selenium.
Not only are chicken livers incredibly nutrient-dense, but they’re also one of the most affordable cuts of chicken. For a fraction of the cost of high-quality supplements, you can serve your family a food that’s naturally rich in essential vitamins and minerals. High quality cod liver oil is great, but if you have to buy it for your whole family, it can get very expensive pretty fast. For most of my time as a mom I couldn’t afford to buy cod liver oil, except occassionally. Liver has always been my go-to way to add vitamins to our family’s diet.
Chicken livers are mild in flavor and easy to work with, which makes them perfect for beginners learning how to prepare organ meats. You can slice them and add them to stir-fries, sandwiches, or even fresh salads for a quick nutrient boost.
How to Choose Good Chicken Livers
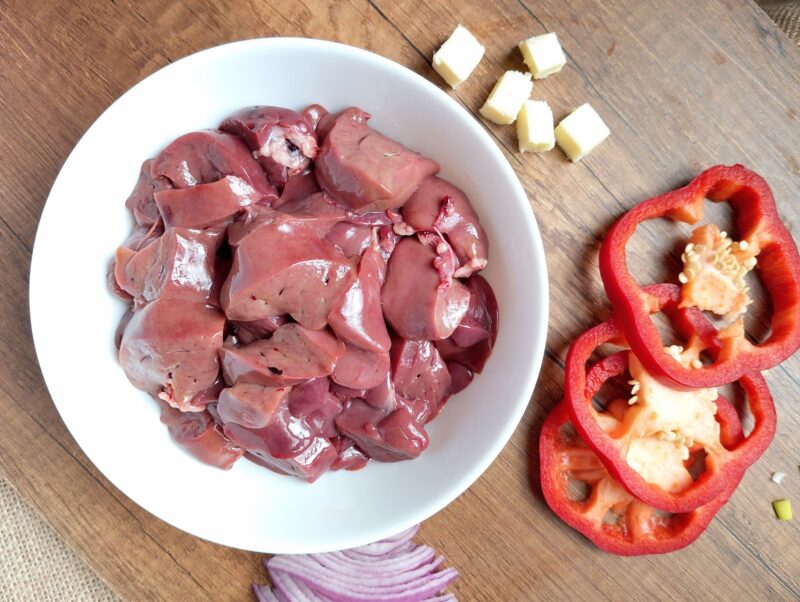
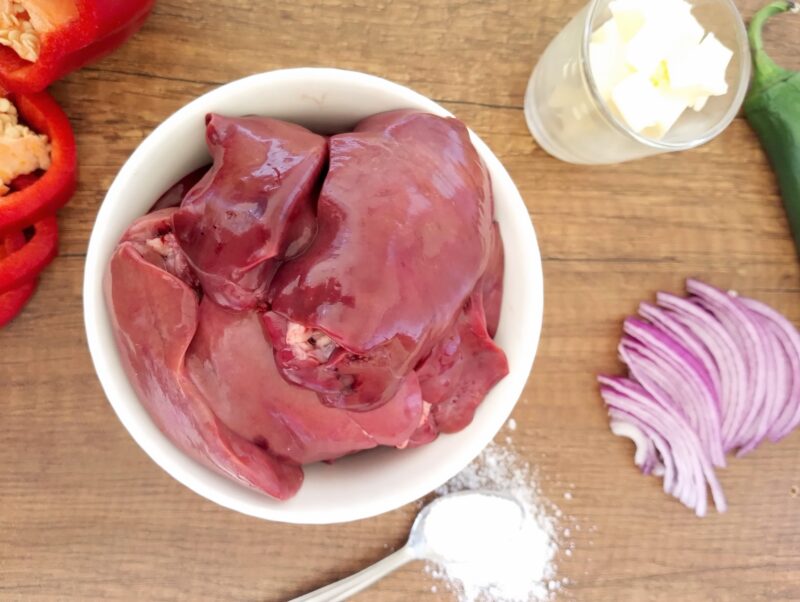
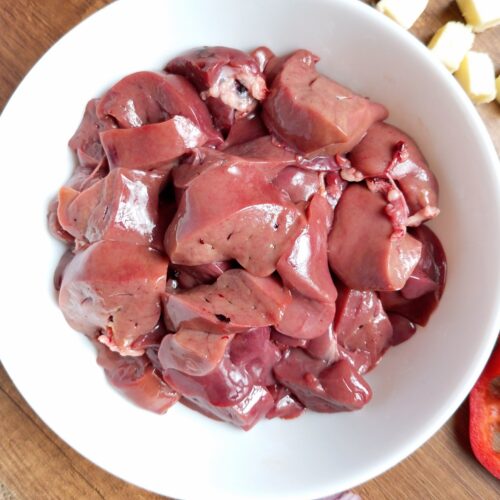
- Look for livers that are deep reddish-brown, smooth, and glossy.
- Fresh livers have a mild, metallic scent. Avoid livers with strong sour or ammonia-like odor.
- Livers should be firm but slightly springy, not mushy or slimy. Avoid livers with excessive liquid in the packaging.
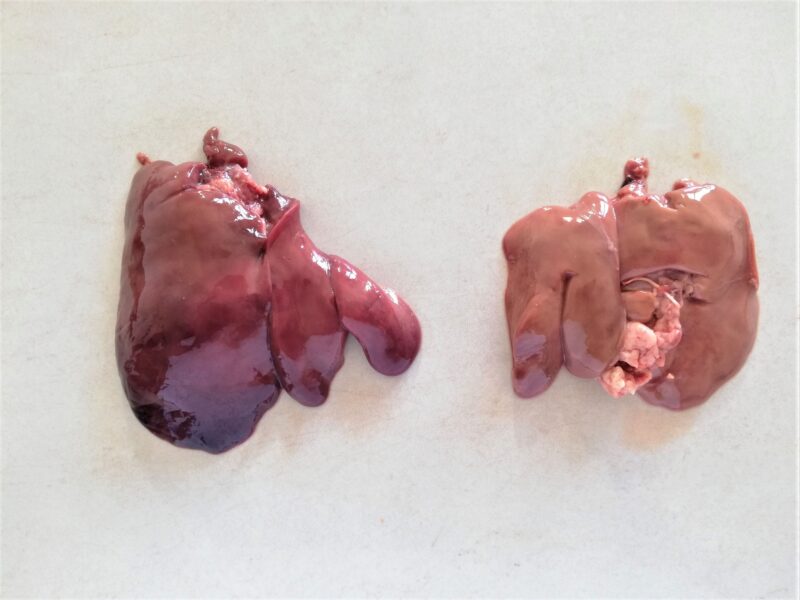
If you’re using livers from home-butchered birds, you may notice a difference in color. Livers from older birds—like spent layer hens—tend to be brown rather than the deep reddish-brown typical of younger birds. This is completely normal and nothing to worry about.
Do You Need to Buy Organic Chicken Livers?
When it comes to flavor and nutrition, pasture-raised or organic chicken livers often come out on top—they tend to be more tender, flavorful, and nutrient-dense than conventionally-raised livers. That said, even standard, non-organic livers are still a superfood. If they’re all you have access to or can afford, don’t hesitate to buy them. Your family will still reap the benefits.
Personally, the only time I’ve been able to get organic livers consistently was when we raised our own chickens. The rest of the time, we simply buy standard livers and still enjoy their rich flavor and nutritional boost. Learning how to prepare chicken livers properly makes them delicious no matter the source.
Do You Need to Clean Chicken Livers?
Cleaning chicken livers is simple. Usually, all that’s required is removing any visible veins and gently trimming off discolored or green-tinged spots. If you’re preparing livers from home-raised birds, be sure to remove the gallbladders. They are the small green sacs filled with bitter bile.
There’s no need to wash livers under running water. In fact, skipping a rinse is better, as washing can spread bacteria. It can also add unnecessary moisture, which can affect how the livers cook (they may steam in the moisture instead of browning).
How to Prepare Chicken Livers (Step-by-Step)
Preparing chicken livers is simple and only takes a few minutes. Follow these five easy steps to clean and prepare them for cooking.
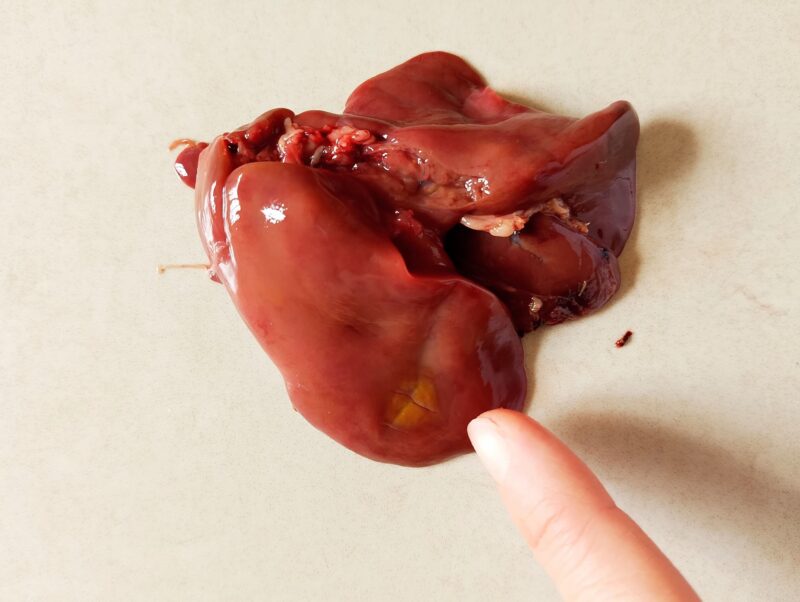
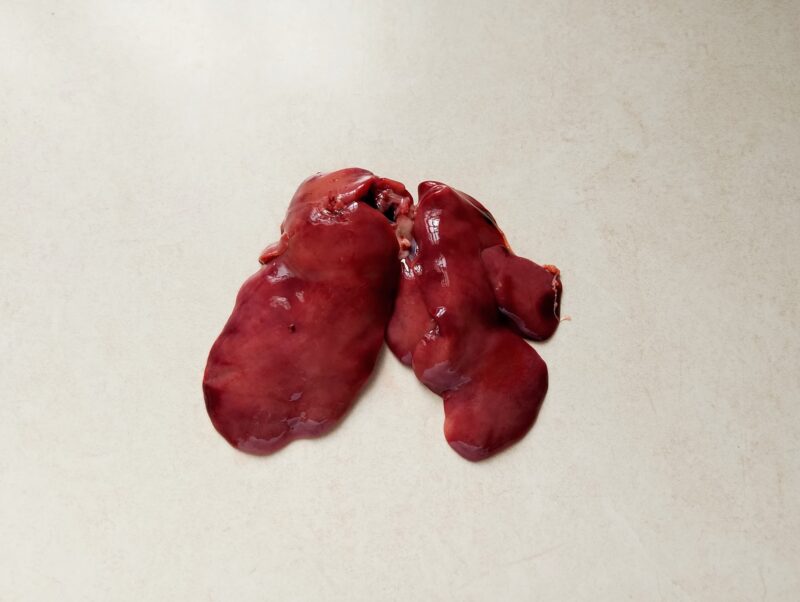
Step 1: Use a sharp knife to remove any discolored or green-tinged areas from the liver. A green hue usually means a small amount of bile from the gallbladder has touched that spot, which will taste very bitter. Carefully trim just below the surface to remove these bits and keep the liver mild and flavorful.
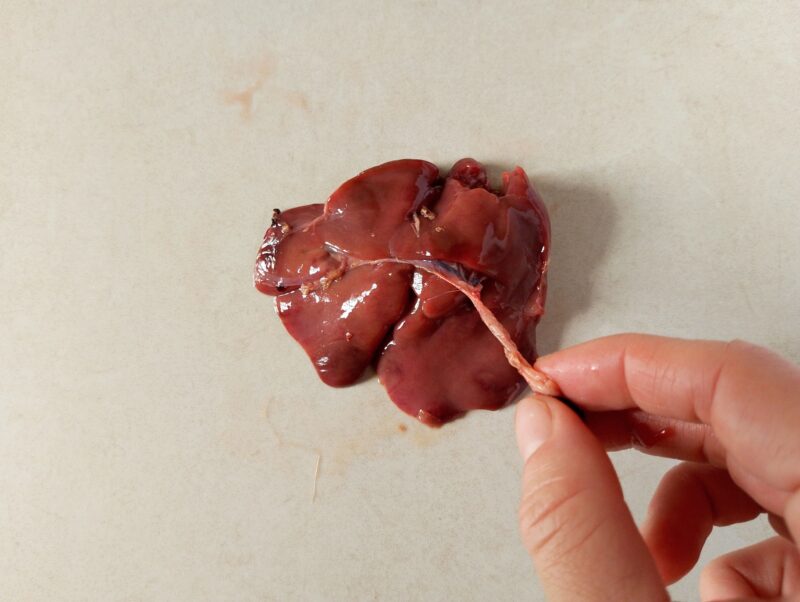
Step 2: Carefully trim away any visible veins from the liver. This step ensures a smoother texture and a more pleasant eating experience, especially for first-time liver eaters.
Step 3: If you plan to cook chicken livers whole, your prep is basically done at this point. Keeping the livers whole is ideal for quick pan-frying or sautéing, as it helps retain a juicy, tender interior with a slight pink center.
If you prefer faster, more even cooking—perfect for stir-fries, gravies, pâtés, or spreads—slice the livers before cooking. Slicing also makes it easier to incorporate them evenly into other dishes.
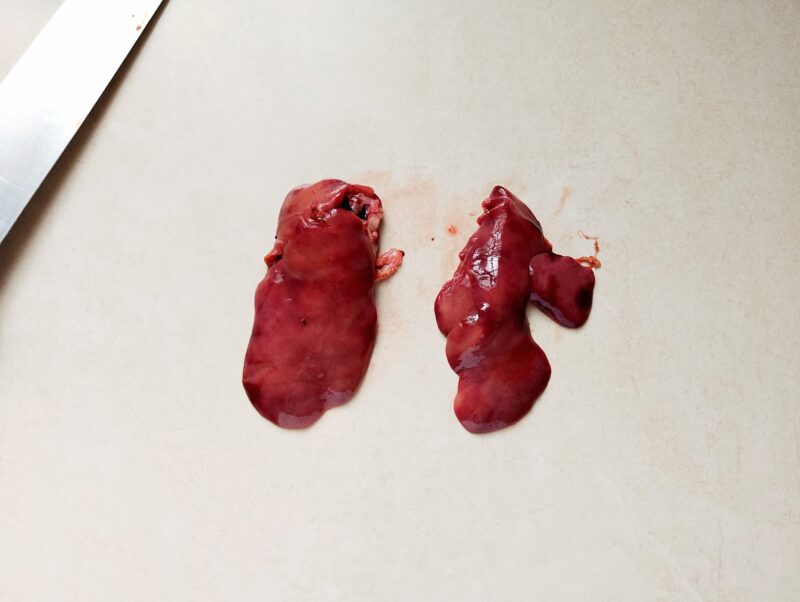
Step 4: Chicken livers are made up of two lobes. The easiest way to slice them is to first cut each liver in half vertically, separating the two lobes. This creates uniform pieces that cook evenly, whether you’re pan-frying, sautéing, or using them in pâtés and spreads.

Step 5: After halving each liver, cut each piece crosswise into 3–4 slices. If the livers feel moist, give them a final pat dry with paper towels. Slicing releases some liquid, and drying them ensures they sear properly in the pan instead of steaming.
Once sliced and dry, your chicken livers are ready to be cooked using your preferred method—pan-frying, sautéing, or any other quick cooking technique.
Kid-Friendly Ways to Serve Chicken Livers
While there’s no guaranteed way to get kids to eat any particular food, I’ve found that how I introduce a new food, how I cook it, and how I serve it can make a big difference in whether they accept it—and even learn to enjoy it. In our family, we eat liver regularly—I aim for at least once a month. For the most part, my kids eat it happily.
Like many families, we’ve gone through periods when certain kids were picky or refused specific foods (including liver), which is completely normal and always passes. For the most part, however, my children have been enjoying liver regularly since they started solids as babies.
Here are my best tips for kid-friendly ways to serve chicken livers that make them approachable, tasty, and family-approved:
1. Start with small amounts
If you’ve never eaten chicken livers—or organ meats in general—it’s unlikely you’ll fall in love with them on the first try. Our taste buds need time to adjust to new flavors. Liver can taste unusual or strong if you’re not used to it. The good news is that with repeated exposure, your taste buds will adapt, and over time, many people find they enjoy the unique, rich flavor of chicken livers. So start small, treating livers like a side dish rather than the main course, perhaps eating a few pieces as a snack with a slice of buttered bread.
2. Cook them gently in butter
Butter makes everything taste better—and chicken livers are no exception! I tried cooking livers in tallow, chicken fat, and coconut oil, and to be honest they do taste the best when cooked in butter. Cooking livers in butter helps keep their flavor mild and more appealing, especially for kids. Always cook them over medium heat for 3–4 minutes per side. Overcooking is the most common mistake people make, and it’s what can make liver tough or grainy. Gentle cooking is key to tender, flavorful chicken livers that your family will enjoy.
3. Pair with familiar flavors
Experiment with different ways of cooking liver to find what you and your family enjoy. Or try adding it to dishes you already make regularly, like stir fries on pan fried meats. Personally, I’m not a fan of cooking chicken livers with tomato sauce, but I absolutely love liver pâté. Remember, one preparation doesn’t define your taste. If you didn’t like liver in a cream sauce, it doesn’t mean you won’t enjoy it prepared another way.
Kids are often more willing to try new foods when the flavors are familiar. Chicken livers taste especially good when paired with caramelized onions, garlic, fresh sage, or other herbs. These simple additions make liver approachable and delicious for the whole family.
4. Chop finely and mix into other foods
Finely chopped chicken livers can be added to ground meat for meatballs or meatloaf, boosting nutrition without dramatically changing the flavor. You can also grind the livers in a meat grinder for a smoother texture. Start by replacing only about 10% of the ground meat with liver so the flavor isn’t too strong.
This simple trick is a great way to introduce liver to kids or anyone hesitant about the flavor of liver.
5. Try chicken liver pâté
Many children enjoy sandwich spreads, and when prepared properly, chicken liver pâté is mild, rich, and creamy. It’s perfect spread thinly on sourdough toast or crackers, and veggie sticks make a fun dipping option for kids. My eldest daughter especially loves this slightly spicy Mexican style liver pâté.
6. Avoid overcooking
Overcooking is the most common mistake when cooking chicken livers. Many people worry that they might not be fully cooked, so they cook them too long. This can make the livers dry and unappetizing.
Chicken livers taste much milder and stay tender when cooked just until done. A slight pink hue in the center is perfectly normal. It doesn’t mean the liver is raw, but that it’s cooked to perfection. Cooking gently is key to achieving flavorful, tender chicken livers every time.
7. Introduce gradually
Pressuring kids to eat a new food usually backfires. Offering small amounts occasionally and letting children become familiar with the flavor over time often works much better than insisting on a full portion. Our taste buds need time to adjust to new flavors. I personally took a while to get used to some organ meats!
Don’t make eating liver a big deal. Treat it as a normal part of your cooking rotation. This is especially effective with very young children, who are more likely to try foods if they see you enjoying them. In our family, all my babies happily ate liver. They then went through typical toddler phases of pickiness, and later returned to enjoying it as they grew older.
Should You Soak Chicken Livers?
Yes! Soaking chicken livers in milk or buttermilk for 30–60 minutes can help mellow their flavor and remove any excess blood, which is especially useful before frying or sautéing.
That said, I rarely soak them anymore. When I was new to eating liver, soaking made a difference. Now that our family enjoys chicken livers regularly, skipping this step is one less thing on my to-do list. The flavor is just fine.
Soaking is optional, but it’s a helpful technique if you’re new to eating liver.
How to Remove The Bitter Taste From Chicken Livers
To reduce bitterness, soak chicken livers in milk or buttermilk for 30–60 minutes. Also remember to trim away any greenish or dark spots before cooking. A greenish spot usually indicates a small amount of bile from the gallbladder. While it won’t make the liver unsafe to eat, it will taste very bitter, so trimming these areas is important.
Cooking technique also matters: cook chicken livers just until tender on each side. Overcooking can make them tough and bitter tasting.
Why Are My Chicken Livers Tough
Chicken livers become tough if overcooked. Cook them just until brown on the outside and slightly pink inside (165°F / 74°C) to keep them tender and creamy. A slight pink tinge inside is normal and does not mean the liver is raw. If your liver looks brown all the way through, it is probably a bit overcooked.
How to Cook Chicken Livers
The secret to cooking chicken livers properly is to cook them quickly and gently. Here is how I like to cook chicken livers so they are perfectly tender and flavorful:
- Prepare the livers: Follow the step-by-step prep in this post: trim any veins or discolored spots and remove gallbladders if using home-raised birds.
- Optional soaking: Soak the livers in milk or buttermilk for 30–60 minutes to mellow the flavor and tenderize.
- Pat dry with paper towels—this prevents splattering in the pan and helps the livers brown properly.
- Keep whole or slice: You can cook livers whole or slice them. I usually slice mine so they cook faster and more evenly.
- Sauté in butter: Melt some butter in a pan and sauté the livers over medium heat for 3–4 minutes per side, turning once, until the inside is just slightly pink. Cut into one piece to check doneness.
- Season: Add salt, freshly ground black pepper, and your favorite seasonings. Garlic and onion powder pair beautifully with chicken livers.
- Deglaze for a quick sauce: Add a splash of broth to the pan to deglaze and create a simple, flavorful sauce.
- Finish with fresh herbs: Fresh herbs elevate the dish—sage is traditional, but feel free to experiment.
- Rest briefly: Let the livers rest 2–3 minutes after cooking to lock in juices and ensure tenderness. Don’t wait longer than that—chicken livers taste best while still very hot.
- Serve: Pair with plain boiled rice, mashed potatoes, or crusty buttered sourdough to soak up the pan juices. For extra flavor, top with caramelized onions—they add sweetness and depth that make the dish irresistible.
Tips For Cooking Chicken Livers So They Taste Good
- Do not overcook: Chicken livers are not suited for long cooking—they can become dry, tough, or mushy if cooked too long. The best methods are quick: pan-frying, stir-frying, sautéing with vegetables, grilling on skewers, quick baking, or air frying.
- Cook in butter or animal fat: Butter makes everything taste better! Cooking livers in butter or rendered animal fat keeps them tender, rich, and flavorful.
- Season well: Butter makes everything taste better! Cooking livers in butter or rendered animal fat keeps them tender, rich, and flavorful.
- Pair with onions or garlic: Chicken livers taste amazing when paired with caramelized onions, sautéed garlic, or fresh herbs. These familiar flavors make liver more approachable, especially for kids or first-time eaters.
Frequently Asked Questions
Storage Tips
Like most organ meats, chicken livers are delicate and perishable, so proper storage is key for both safety and taste. Here are my top tips for storing chicken livers:
Buy Fresh, Not Frozen (if possible)
Look for livers that are bright reddish-brown, glossy, and moist. They should not be slimy or discolored. If they have a strong odor, don’t buy them – a mild metallic scent is normal and fine.
Keep Them Cold Immediately
As soon as you get home, place your chicken livers in the refrigerator. Use an airtight container or a well-sealed plastic bag to prevent cross-contamination as the livers can leak a little liquid. You can line your container with a paper towel to absorb excess moisture, then cover tightly.
Short-Term Storage
You can store chicken livers in the coldest part of your refrigerator for 1-2 days.
Freezing for Longer Storage
- For long term storage, freeze your chicken livers as soon as possible after purchase.
- Before freezing, clean the livers as shown in this post, then pat them dry.
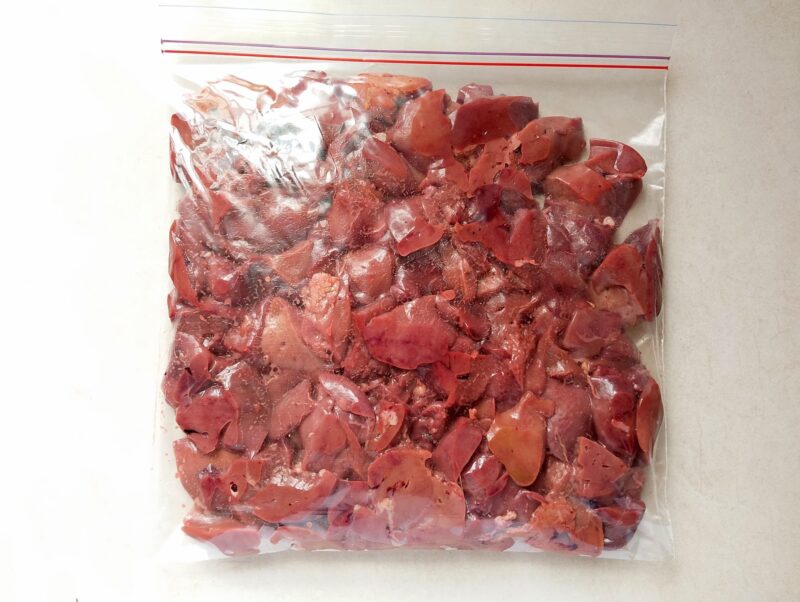
- To prevent the livers from clumping into one big mass, flash freeze them in a single layer on a baking sheet or tray for 1-2 hours. Then transfer them to a ziplock bag, removing as much air as possible from the bag.
- Label with date – the livers can last up to 3–4 months in the freezer without losing flavor or texture.
- Always defrost overnight in the refrigerator, not on the counter. If you are short on time, you can submerge the sealed bag in very warm water for 30–60 minutes, changing water as needed. That’s what I often do – I never remember to defrost them in advance!
- Once cooked, livers last only 2–3 days in the fridge, so freeze any leftovers if needed.
Final Thoughts
I hope this tutorial has been helpful! I’ve shared plenty of practical tips to make learning how to prepare chicken livers easy and approachable. If you’re just starting to include liver in your cooking rotation, don’t worry—once you know the basics, preparing and cooking chicken livers is quick and simple.
If you love real food recipes and old fashioned skills, be sure to subscribe to my weekly newsletter.
Family-Friendly Chicken Liver Recipes
Nutrient-Rich Chicken Liver Pâté
Mexican Style Chicken Liver Pâté
How To Prepare Chicken Livers
Equipment
- sharp knife
- paper towels
Ingredients
- 500 g (1 lb) chicken livers
Instructions
- Trim discolored or green spots: Use a sharp knife to remove any discolored or green-tinged areas. These spots usually indicate a small amount of bile from the gallbladder, which can taste very bitter. Carefully trim just below the surface to keep the liver mild and flavorful.
- Remove any veins: Trim away visible veins to create a smoother texture and a more pleasant eating experience, especially for beginners.
- Decide whether to keep whole or slice: Whole livers are ideal for quick pan-frying or sautéing. Keeping them whole ensures they stay juicy and tender with a slight pink center. Sliced livers are perfect for stir-fries, gravies, pâtés, or spreads. Slicing ensures faster, more even cooking.
- Slice the livers (if desired): Chicken livers have two lobes. Cut each liver vertically in half to separate the lobes for uniform pieces.
- Slice crosswise and pat dry: Cut each half crosswise into 3–4 slices. Pat dry with paper towels if the livers are moist—this helps them sear properly instead of steaming.
- Now your chicken livers are ready to cook! Use your preferred method: pan-fry, sauté, stir-fry, grill, or air fry.
Notes
- Keep the livers slightly pink inside for tenderness.
- Use butter for cooking to enhance flavor.
- Pair with familiar flavors like onions, garlic, or fresh herbs for approachable, family-friendly meals.
- It takes about 10 minutes to prepare 500g (1lb) of chicken livers following the above steps.
- Chicken livers freezes well. Flash freeze them on trays, then transfer to a ziplock bag, removing as much air from the bag as possible.
- The simplest way to cook chicken livers is to pan fry them in butter, a few minutes on each side. Don’t cook them too long or they will dry out.
- Any leftover cooked liver can be blended with some butter and a little milk (plus any seasonings that you like) to make a delicious sandwich spread.


Ok, so you explain how you tell if they are overcooked – but how do you tell if they are cooked? Meat thermometer to 165?
Thanks!
If you want to be absolutely sure, then yes you can check with a meat thermometer. If it reads 165, they are good. I usually check without a thermometer by cutting through one or two of the biggest pieces with the edge of my wooden spoon. The outside should be opaque and browned, the inside should be uniformly pink – not raw or bloody. A little blush of pink is normal and safe to eat. When the livers are cooked, the texture will be firmer than raw livers, but still slightly tender.