Easy No-Cook Homemade Granola Bars (Soft, Chewy & Kid-Friendly!)
These are hands-down the best no-bake homemade granola bars you can make. They’re naturally sweetened with dates, full of nourishing ingredients, and quick to whip up in the food processor. They also store beautifully in the fridge for days—though in my house, they rarely last that long!
I love packing them for outings when I don’t have time to make sandwiches. Paired with a banana and a glass of raw milk, they make a filling, energy-boosting snack for both kids and grown-ups. I hope you give them a try—you might just stop buying granola bars altogether.

Why Make Granola Bars at Home
Store-bought granola bars are often loaded with sugar, preservatives, or unnecessary fillers—and the healthier options can be expensive, especially when you’re feeding multiple kids. These homemade granola bars are a wholesome alternative: naturally sweetened with fiber-rich dates and packed with protein from nuts, seeds, and peanut butter. Best of all, they’re no-bake—perfect for hot summer days when you don’t want to turn on the oven.
Once you know how to make them, you can easily adapt the recipe to suit your family’s tastes. Since all the ingredients are finely chopped or blended, these bars are toddler-friendly too—soft, easy to chew, and full of nourishing ingredients. It’s a snack you can feel good about giving your kids.
Tips for Making This Recipe
- Toasting the oatmeal and the walnuts really improves their flavor so don’t skip this step.
- It is really important to chop the nuts and dates into small pieces or the granola mix won’t hold together, it may start to break apart when you try to cut it into individual bars. Use your food processor here, or chop everything by hand with a large chef’s knife.
- Choose soft, moist dates – in this recipe the dates and the peanut butter are a binder, if you use drier dates, the mixture won’t stick together well. Because it is a no cook recipe, you cannot really use honey instead of dates – the bars would be way too sticky.
- You may not need the whole 2 cups of dates – I find that sometimes 1 1/2 cups is enough to make bars that hold well together.
- Instead of peanut butter you could use natural almond butter.
- Instead of walnuts, you could use another type of nuts, for example toasted almonds or pecans. Make sure to chop them small.
- Feel free to replace sesame seeds with other type of small seeds. If you use larger seeds, you will need to chop them smaller.
- This is a no-cook recipe, ideal for meal prep during the hot summer days.
- To make this recipe gluten-free, use certified gluten-free oats.
- To make these granola bars even more nutrient-dense, soak the seeds and nuts overnight in water with a little salt. Then dry them in the dehydrator or in a warm oven until perfectly crispy before adding them to this recipe.
What Helps Granola Bars Stick Together?
In this recipe, chopped dates and peanut butter act as the natural binder that holds everything together—while still giving the bars that soft and chewy texture everyone loves. To get the best results, make sure to chop the walnuts and dates finely. (I find it easier to chop dates by hand first rather than in a food processor, since they are sticky and tend to clump together in the food processor.)
Once all your ingredients are prepped, pulse the mixture in the food processor until it starts to come together. Add the chopped dates gradually, pulsing well between additions. This helps break up any sticky clumps and ensures the dates are evenly distributed throughout the mix.
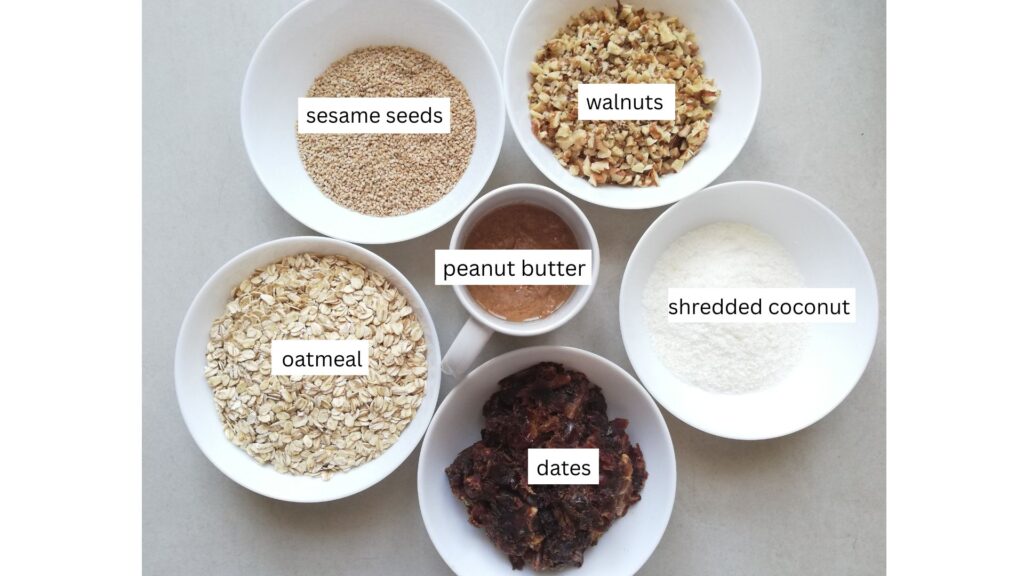
Ingredients for the Homemade Granola Bars
How to Make Granola Bars at Home (No Cook Method)
Step 1

First spread the oatmeal and chopped walnuts in a large oven proof tray and toast in a 180°C/350°F oven for 10-15 minutes until golden and fragrant. Stir them once during that time to make sure they toast evenly. Keep an eye on them – the walnuts can quickly burn if left too long in the oven.
Step 2
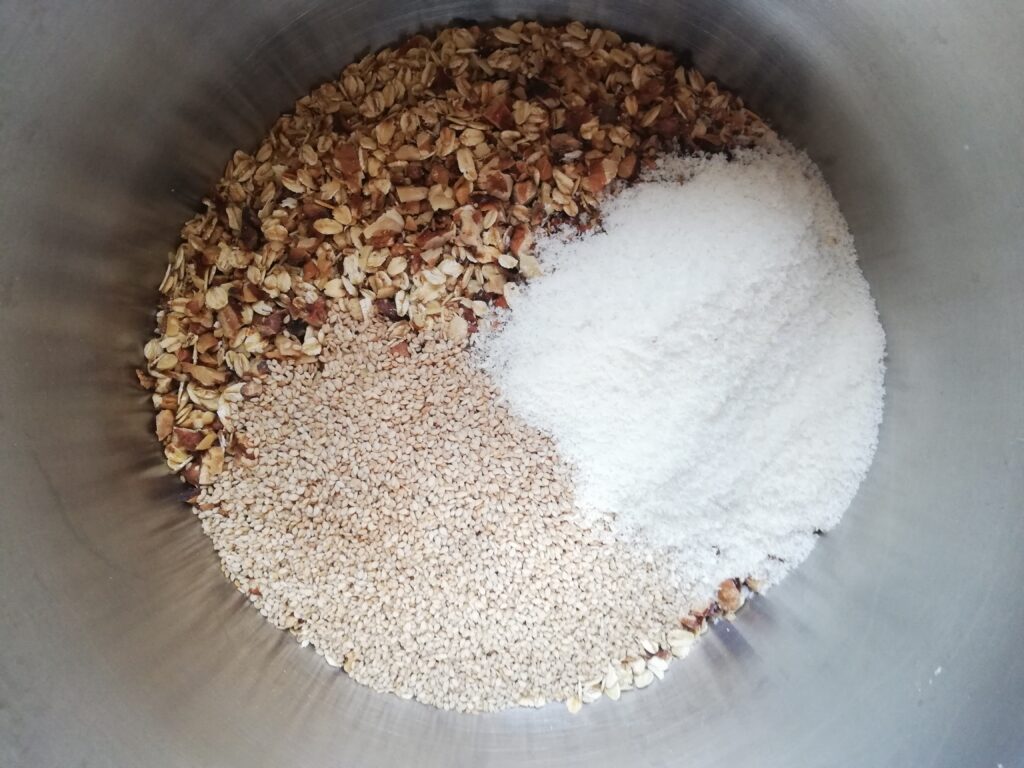
Once the oatmeal and walnuts are toasted, combine them with the sesame seeds and shredded coconut in a large bowl (or in the bowl of your food processor if you are using it). Mix them well together.
Step 3

Add in the finely chopped dates and the peanut butter. Mix together first with a wooden spoon and then with your hands – this will require some muscle power. Alternatively, pulse the mixture in the food processor until it starts to come together.
Step 4

Squeeze some of the mixture together in your hands as if you were trying to make a snowball. If it sticks together, it is ready to go into the molds. If it still feels crumbly, add some more dates or peanut butter (or both) until it starts to stick together.
Step 5

Transfer the granola bar mix to containers lined with baking paper. You could use an old shoe box, a square or rectangular cake tin, or a plastic food container. It is best if your container has square corners (not rounded corners like the loaf pans I used) because then it is easier to cut the granola mix into bars later on.
Step 6

Press on the mixture firmly with the back of a metal spoon or with your hands until it is packed and the top is flat and even. My mixture filled two 9×5 inch loaf pans to a thickness of about an inch. It is best if your mix is about 1-1 1/2 inch thick for ease of cutting it into bars or squares later on.
Step 7
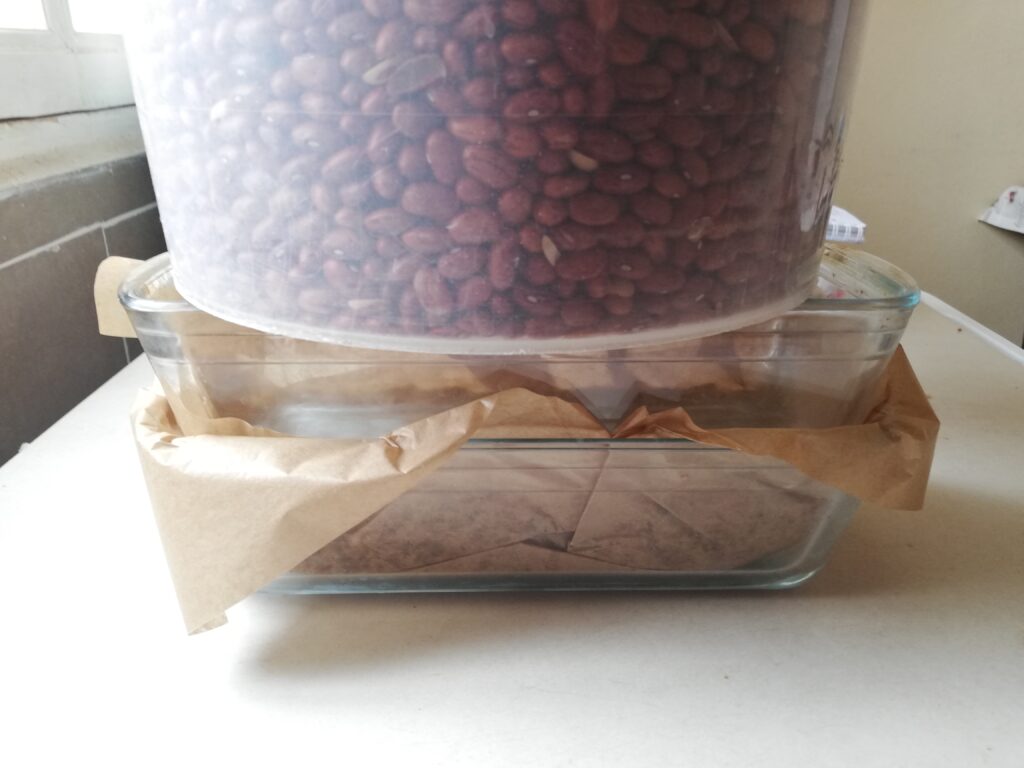
Place a sheet of baking paper on top of your granola mix in the molds and press down evenly with something heavy. Lots of options here. I used another matching loaf pan to place on top and I weighed it down with a bucket of beans. In the past I used a couple of heavy books with equally good results. Basically you want something that will fit the container you are using for the granola mix so you can flatten the mixture evenly, and then something heavy to go on top of that. Keep it on for about an hour.
Step 8

After the granola mix has been pressed for about an hour, remove the weight and place the container with the granola in the fridge to chill for at least an hour. Then remove from the fridge and cut the bars into the sizes you want. These bars are very filling so I prefer to cut them into small squares rather than the usual bar shape, so they are small enough for my young kids to eat.
Storage, Serving, and Kid-Friendly Tips

- These homemade granola bars will keep in the fridge for a few weeks, probably even longer. Because they do not contain liquids, they are very shelf stable. Keep them in a container with a tight lid, for example a large mason jar.
- These granola bars are also freezer friendly.
- If you have very young kids, cut the bars really small so they make a toddler-sized serving.
- These granola bars are a great addition to lunchboxes and picnic baskets.
Conclusion: Nourishing Snacks Made Simple
Homemade granola bars are one of the easiest and healthiest snacks you can make for your family. Once you get the hang of this simple no-bake recipe, it’s easy to mix things up with your favorite add-ins or create seasonal variations—think cinnamon and clove in fall, or bright cranberry and orange for winter. They’re perfect for lunchboxes, busy mornings, or a nourishing grab-and-go treat.
Want more from-scratch recipes, homemaking tips, and traditional skills? Subscribe to my newsletter for weekly inspiration, or follow me on Pinterest for daily ideas!

No-Cook Homemade Granola Bars
Equipment
- food processor (recommended but not essential)
Ingredients
- 1½ cups oatmeal (rolled oats or steel cut oats)
- ½ cup chopped walnuts
- ½ cup shredded coconut
- ½ cup sesame seeds
- 1½ – 2 cups pitted and chopped dates
- 1 cup natural peanut butter
- ¼ tsp fine sea salt
Instructions
- Spread the oatmeal and chopped walnuts in a large baking dish and toast in a 180°C/350°F oven for 10-15 minutes until golden and fragrant. Stir them once to make sure they toast evenly. Keep a close eye on them – the walnuts can quickly burn if left too long in the oven.
- In a large mixing bowl or in the bowl of your food processor, combine the toasted oatmeal and walnuts with the sesame seeds and shredded coconut. Mix it/pulse it all well together.
- Add in the finely chopped dates and the peanut butter. Mix together first with a wooden spoon and then with your hands – this will require some muscle power. Alternatively, pulse the mixture in the food processor until it starts to come together.
- Squeeze some of the mixture together in your hands as if you were trying to make a snowball. If it sticks together, it is ready to go into the molds. If it still feels crumbly, add some more dates or peanut butter (or both) until it starts to stick together.
- Transfer the granola bar mix to a container lined with baking paper. You could use an old shoe box, a cake tin, or a plastic food container. It is best if your container has square corners because it makes it easier to cut the granola mix into bars later on. Your mix should make a block about 1-1 1/2 inch thick for ease of cutting it into bars or squares.
- Press down firmly on the mix with the back of a metal spoon or with your hand until it is evenly flat.
- Place a sheet of baking paper on top of your granola mix in the container and press down evenly with something heavy. I used another matching loaf pan to place on top and I weighed it down with a bucket of beans. In the past I used a couple of heavy books with equally good results. Basically you want something that will fit the container you are using for the granola bars so you can flatten the mixture evenly, and then something heavy to go on top of that. Keep it on for about an hour.
- After the granola mix has been pressed for about an hour, remove the weight and place the container with the granola in the fridge to chill for at least an hour. Then remove from the fridge and cut it into the size of bars you want. These bars are very filling so I prefer to cut them into small squares rather than the usual bar shape, so they are small enough for my young kids to eat.
Notes
- These bars should be kept in a covered container in the fridge where they will last for at least a few weeks. Most likely though they will be all gone before that time!
- You can also freeze the bars in a ziplock bag.
- Make sure to chop all the ingredients finely by hand or in the food processor – any larger pieces will make the granola mix break apart when you try to cut it into bars or squares.