How to Make Paneer With Raw Milk — Simple, Homemade & Delicious
I love making fresh cheeses because they’re simple and quick to prepare—and if you don’t have a cow or an abundance of milk (I don’t!), they give you a surprisingly high yield of cheese per quart of milk. This raw milk paneer recipe is one I’ve been making for years, and it’s a favorite in my kitchen. Not only is paneer delicious and mild-flavored, but it also holds its shape when cooked. When fried, it turns beautifully golden and crisp on the outside, making it perfect for salads and open sandwiches.
In this tutorial, I’ll show you how to make paneer from raw milk, how to cook it, how to store it, and I’ll answer common troubleshooting questions along the way.

What Is Paneer?
Paneer is a fresh, non-aged cheese that’s popular in India and other South Asian countries. It’s made by heating milk and then adding an acid—usually lemon juice or vinegar—which causes the milk to separate into curds and whey. When making homemade paneer, especially with high-quality or raw milk, the curds are simply drained, lightly salted, and pressed into a mold to firm up.
One of the unique qualities of paneer is that it doesn’t melt when heated, making it ideal for grilling or frying and for using in dishes like curries. Paneer has a very mild flavor and a firm, sliceable texture, which also makes it a great choice for sandwiches and salads.
Can You Make Paneer With Raw Milk?
Yes, you can. Paneer can be made with almost any type of milk—even UHT milk—although full-fat milk will always give you a higher yield of cheese. In this recipe, I show you how to make paneer with fresh raw milk, which many people prefer for its nutrient profile.
That said, it’s worth noting that raw milk paneer isn’t a truly raw cheese. The milk must be heated to a boil before the vinegar (or other acid) is added to separate the curds and whey. Even so, using fresh, high-quality raw milk still produces a beautifully textured, flavorful homemade paneer.
Why You’ll Love This Easy Homemade Cheese
- It’s incredibly easy. Paneer is one of the simplest fresh cheeses you can make from scratch — perfect even if you’re new to cheesemaking. Even if you’ve had trouble with other cheeses, don’t despair – paneer is forgiving. Avoiding common mistakes is easy with a few simple tips.
- Made with real, wholesome ingredients. Just milk and an acid (like vinegar or lemon). If you use raw milk, you get a beautifully soft, creamy paneer with rich flavor and excellent texture.
- Quick recipe with reliable results. From heating the milk to pressing the cheese, the whole process takes under 2 hours (and most of it is passive time).
- Super versatile. Paneer is soft, gentle in flavor, and never sharp — great for picky eaters.Whether you want to fry paneer, add it to curries, toss it into salads, or serve it as protein in homestead meals, this cheese fits everywhere.
- No special eqipment needed – in this tutorial I even show you how to make an improvised cheese press from items you likely already have in your kitchen.
Tips for Making This Raw Milk Paneer
- This recipe uses 2 liters (1/2 gallon) of milk and will make approximately 12 ounces (350 grams) of paneer. Your yield will vary a little based on the type of milk you use and how long you let your cheese drain. You can easily double or triple this recipe to make a larger quantity of cheese. Make sure you have a pot and a colander big enough to handle that much milk.
- Because it is a fresh (non-aged) cheese, it will keep in the fridge for only 3-4 days. To keep it longer than this, you will need to freeze it.
- Instead of vinegar, you could use an equal amount of lemon juice.
- If you don’t have access to raw milk, you can make this cheese with pasteurised milk. It is always best to use full fat milk in cheesemaking.
Ingredients You’ll Need

Eqipment
- Heavy bottomed pot to heat the milk.
- Large wooden or metal spoon to stir the milk while it heats up.
- Ladle or slotted spoon to remove the cheese curds from the pot.
- Colander and a cheesecloth (or 2 clean muslin or thin cotton tea towels)
- Sieve to use as a mold (or use a small cheese mold if you have it)
Step-By-Step: How to Make Paneer (With Vinegar)
Step 1

Heat the milk: Pour the milk into a heavy-bottomed pot and place it over medium-high heat. Stir occasionally to prevent scorching on the bottom. It will take about 15 minutes to come to a gentle boil. Stay nearby while heating, as milk can quickly foam up and boil over if left unattended.
Step 2

Rest the milk: Once the milk comes to a boil, remove the pot from the heat and let it sit for 1–2 minutes. This brief resting period helps the curds form more evenly when you add the acid.
Step 3

Add the acid: Stir in the vinegar (or lemon juice) gently—just one or two slow stirs is enough. Be careful not to overmix, as overstirring can break the fresh curds and affect the texture of your paneer.
Step 4

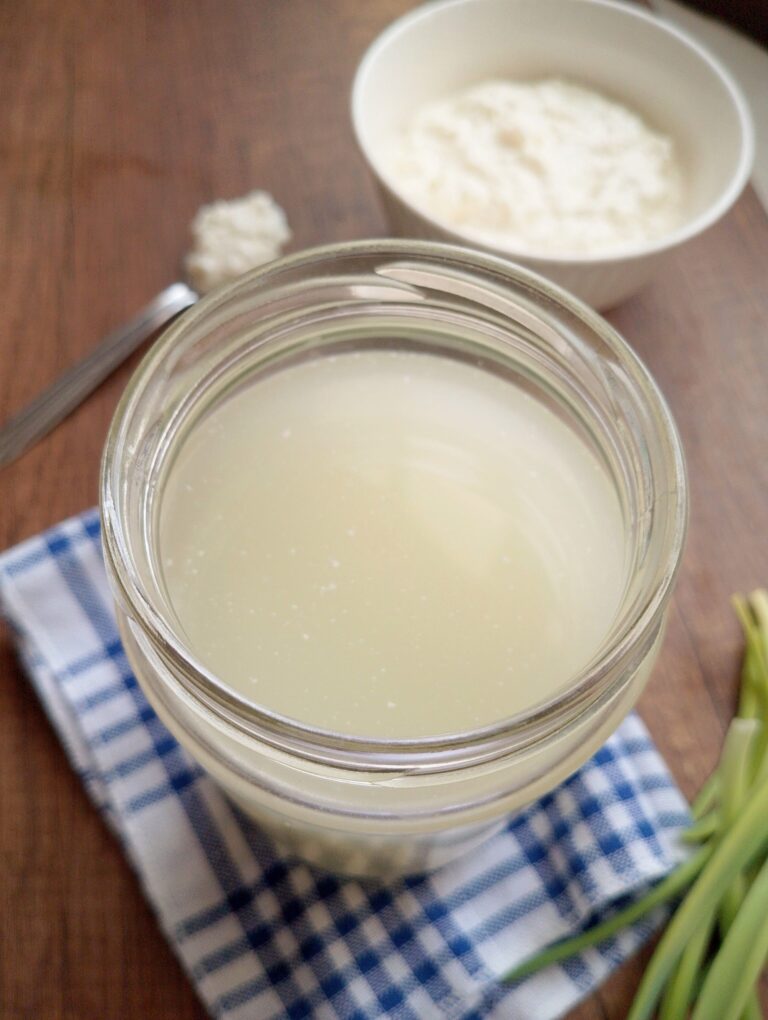
Separate the curds and whey: The milk should separate almost immediately into white curds and yellowish whey. If the whey still looks milky, add a little more vinegar, one tablespoon at a time, until it clears. Let the pot sit undisturbed for about 10 minutes to allow the curds to fully form.
Step 5

Drain the curds: Line a colander with a clean cheesecloth, or a cotton or muslin tea towel, and set it over a large pot or bowl. Using a ladle or slotted spoon, gently transfer the curds into the lined colander. Pour the whey slowly over the curds to help drain them without breaking them apart.
Step 6

Drain the curds: Let the curds sit in the cheesecloth for about 10 minutes to drain. (Quick note: I know my cheesecloth looks a little discolored, but don’t worry—it’s not dirty. I don’t bleach them, so they naturally darken after many uses. I wash them gently with mild soap and air-dry. If you want to sterilize them before use, you can boil the cloth in water.)
Step 7

Add salt and optional flavorings: When most of the whey has drained but the curds are still warm and soft, sprinkle in the salt. You can leave the paneer unsalted if you prefer, though it will taste quite bland. This is also a great time to add flavorings like chopped fresh herbs—chives, coriander, or parsley—to give your homemade paneer a fresh, aromatic twist.
Step 8

Mix in the salt: Gently fold the salt (and any optional herbs) into the curds using a fork, making sure it’s evenly distributed without breaking up the curds too much.
Step 9

Prepare to press the paneer: Line a small sieve with a piece of cheesecloth or a clean tea towel, and set it over a jar or bowl. Transfer the salted curds into the cloth. If you have a cheese mold, you can use that instead for a more uniform shape.
Step 10

Press the paneer: Fold the cheesecloth over the curds and place a small plate on top. Add weight with a can or a jar filled with water to press the cheese. (If you have a cheese press, you can use that, but this method keeps it simple and accessible to anyone without special equipment.) Let the paneer press for 30–60 minutes until it firms up.
Step 11

Unmold and store: After pressing for about an hour, carefully unwrap the paneer from the cheesecloth. For easier slicing, chill the paneer in the refrigerator for 30–60 minutes before cutting—it will hold its shape better. You can also slice and use it immediately with a sharp knife, or store it in the fridge until ready to use. Keep it covered to prevent it from drying out.
How to Cook Paneer Well

Paneer can be eaten fresh, or it can be cooked. It’s one of the few cheeses that doesn’t melt when heated, which makes it perfect for grilling or frying. If you plan to cook with your paneer, be sure to let it drain thoroughly and firm up first. For even easier slicing, chill the paneer in the fridge for 30–60 minutes before cutting—it will hold its shape better and won’t stick to the pan when fried, giving you beautifully golden results.
Serving Ideas: What Is the Best Way to Eat Paneer?
- Pan-Fried Paneer: Slice or cube the paneer and lightly fry in butter, ghee, or tallow until golden on both sides. Serve with vegetables, grains, or eggs.
- Classic Indian Curries: Add paneer to tomato-based or spinach-based sauces for dishes like paneer curry or palak paneer.
- Simple Weeknight Protein: Toss warm paneer cubes with roasted vegetables, herbs, and a drizzle of olive oil or ghee.
- Salads: Add pan-seared paneer to fresh salads. My favorite is a salad made by layering arugula leaves, sliced tomatoes, and seared paneer slices. I drizzle some olive oil over that and sprinkle some salt and pepper on top.
- Wraps & Flatbreads: Stuff fried paneer into flatbreads with greens, yogurt sauce, or chutney.
- Breakfast Ideas: Serve paneer alongside eggs or lightly fry and add to savory breakfast plates.

How to Store Paneer
- In the refrigerator: store fresh paneer in an airtight container or submerged in a jar of clean, cold water. Stored this way, it will keep for 3-4 days (I kept it up to 7 days on occassion and it was fine, but it’s usually recommended not to go beyond 3-4 days).
- Paneer can also be frozen for up to 2-3 months although the texture can become a little crumbly after thawing. For convenience, cube it or slice it before freezing. Wrap it tightly to prevent freezer burn or place it in a freezer-safe container, removing as much air as possible.
- Frozen and thawed paneer is best used in cooked dishes, such as curries.
Recipe FAQ

Happy Cheesemaking!
I hope you enjoy making this raw milk, Indian-style cheese! Fresh cheeses are wonderful because they don’t require any special equipment, are ready to eat the same day, and have a mild, versatile flavor that kids and adults alike will enjoy. If you loved making this paneer, be sure to check out my raw milk cottage cheese tutorial. For more old-fashioned, farmhouse-style recipes and tips, subscribe to my weekly newsletter.

Raw Milk Paneer
Equipment
- heavy bottomed pot
- large wooden or metal spoon
- cheesecloth or 2 muslin or cotton tea towels
- ladle or slotted spoon
- small sieve or cheese mold
Ingredients
- ½ gallon (2 liters) raw milk
- ¼ cup white vinegar
- ½ Tbsp fine sea salt, or to taste
Instructions
- Heat the milk: Pour milk into a heavy-bottomed pot and heat over medium-high heat, stirring to prevent scorching. Bring to a gentle boil.
- Rest the milk: Remove the pot from heat and let it sit undisturbed for 1–2 minutes.
- Add the acid: Stir in vinegar or lemon juice gently—just 1–2 slow stirs. Avoid overmixing to keep curds intact.
- Separate curds and whey: Milk should curdle immediately. If whey is still milky, add vinegar 1 Tbsp at a time. Let it sit 10 minutes.
- Drain the curds: Line a colander with cheesecloth (or cotton/muslin towel) and set over a bowl. Gently transfer curds and pour whey over to help drain.
- Initial draining: Let curds drain for 10 minutes.
- Add salt & flavorings: Sprinkle salt over warm curds. You can also add your favorite chopped herbs at this point.
- Mix gently: Fold salt and herbs evenly with a fork without breaking curds.
- Prepare to press: Line a small sieve with cheesecloth (or use a small cheese mold). Transfer curds into it.
- Press the paneer: Fold cloth over curds, place a plate on top, and weigh with a can or jar. Press 30–60 minutes until firm.
- Unmold and store: Carefully unwrap the paneer. Chill 30–60 minutes before slicing for cleaner cuts. When storing the paneer in the refrigerator, keep it covered to prevent drying.
Notes
- Pan-fried in butter or ghee until golden
- Added to curries or simmered sauces
- Tossed with roasted vegetables
- Served in wraps or flatbreads
- Added to salads or grain bowls
- Stirred into soups or stews near the end of cooking